|
|
Post by Ron on Dec 11, 2013 7:31:29 GMT -6
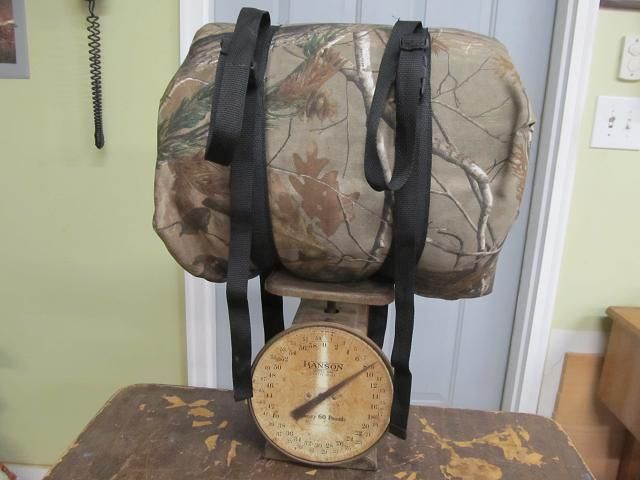
I have a growing interest in staying warm on stand so I’ve looked into the heater body suit and the warmbag and the IWOM. After looking at them all I think I want to make my own and combine some of the features I think I want. The WI gun opener was very cold (single digits) with wind chills below zero. The bow season was also cold and windy and now that I am down to 185 pounds, I struggle more with keeping warm. Here are the 3 products I looked into when considering making my own. I like features of each so I am combining. 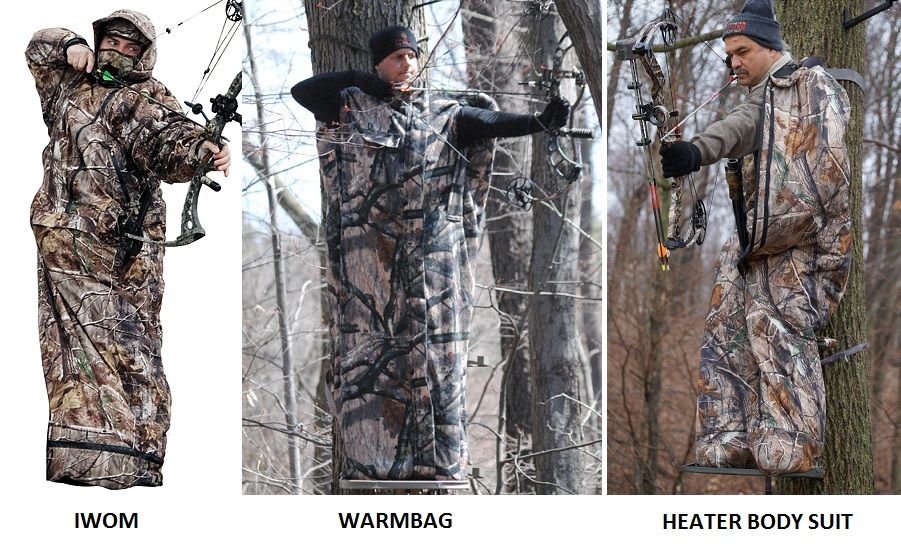 It’s the off season and it gets dark at 4:30 pm so it’s time for winter projects so I’m firing up the sewing machine and thought I’d share this project with those interested in constructing their own cold weather gear. This will be a work in progress and a sort of “learn as you go” since I have never made something like this before. Step one is making a pattern. It would really be easy if I skipped the legs/feet such as the Heater body suit employs but I like that feature so pattern making gets a bit more difficult, not because of the feet or the legs but the gathering of the panels that meet at the crotch. 4 panels all have to meet in the same place and must be sewn inside out and with multiple layers of material so spending time up front getting the pattern right will pay off when I get to the sewing machine (and because I expect to make a couple of these suits for family members and don’t want to have to figure it out over and over.) I sketched out a few patterns and then transferred the patterns to old bed sheets to see if I got it correct. On a side note, it appears that one king sized top sheet is large enough to cut all the pieces from. **TIP** King sized top sheets are easy to find while your wife is gone Christmas shopping. They are in the closet at the end of the hall. ;-) Here are the pattern pieces that make up the panels to sew the suit. Note! Two of the foot panels are required. 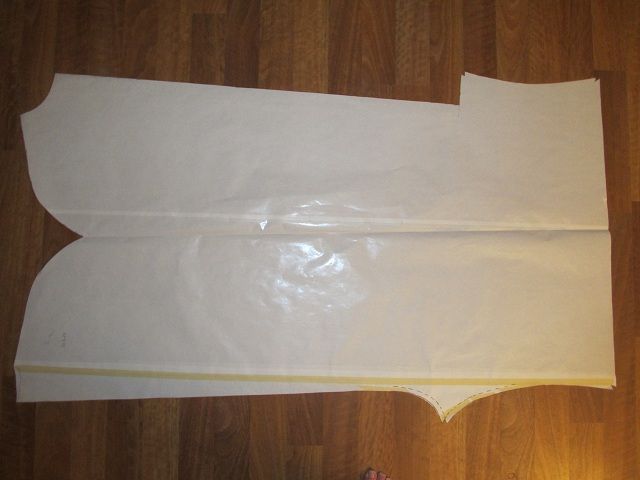 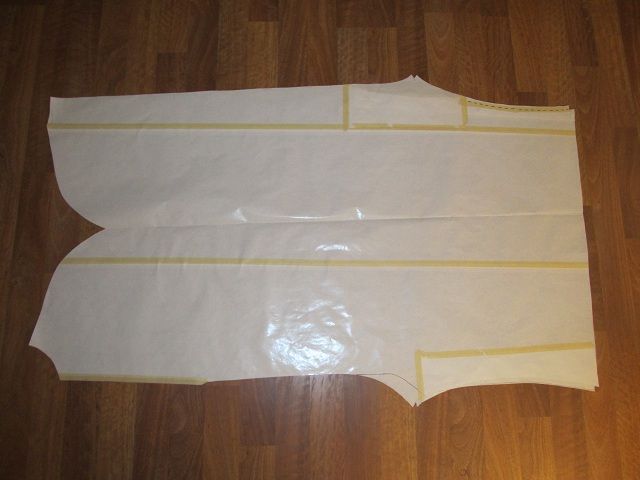 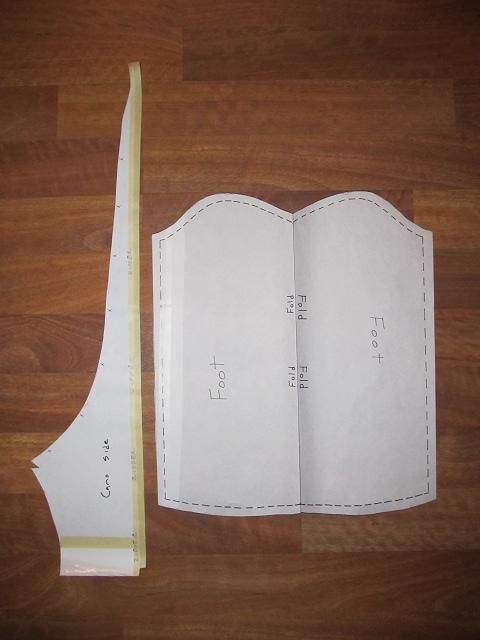 Then I traced the pattern pieces onto the bed sheet to make the prototype. 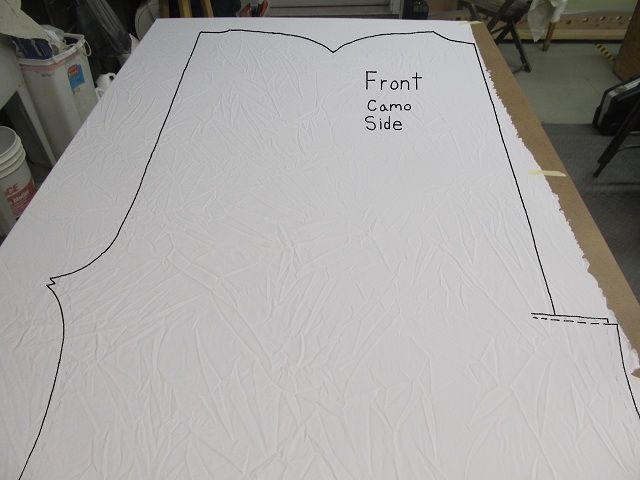 I like the big main zipper of the HBS but I want the flexibility of also having arm zippers if I want to use binos or make/take a phone call or other reasons to have my arms outside the bag without losing all the warmth by getting out of the bag so my bag will have 3 zippers. The flap is 1 3/4" wide to make sure to protect the zipper from wind/rain/icing up. Both arm zippers will also have protective flaps.  Here is prototype #3. I think I have the pattern figured out without having to test my work on the expensive material. (plus now I have an idea of what to get the wife for Christmas........... New king sized bed sheets) 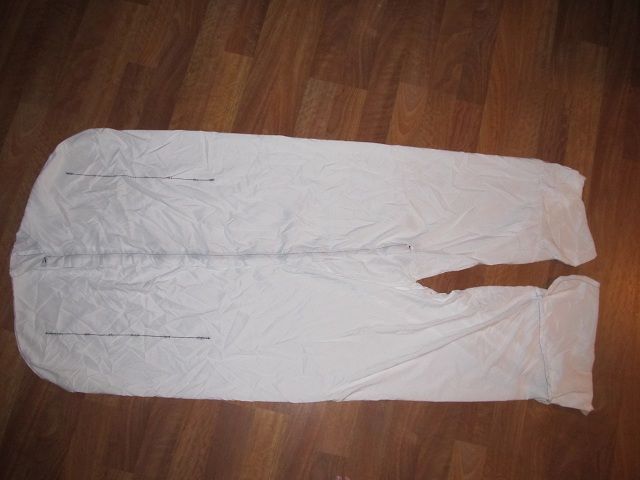 All the layers of the bag will be polyester so it makes sense to sew the bag with polyester thread. Coats makes a thread for outdoor projects. It’s very strong. I can’t break one strand when wrapped around my hands so I think it will hold up well.  Something we take for granted but is paramount to the design of such a hunting garment is the zipper. In this case the ability to get out quickly and quietly. You may not have noticed that most zippers don’t just fall open and must be activated by pulling on the toggle to move the closure. That is except for a double pull sleeping bag zipper. For safety reasons it has to open even on falt and from both sides. If you were to grab and pull a regular zipper by the ends of the fabric wings used to sew it to the project you will find the zipper will not open meaning you won’t be able to get the toggle and closure to fall simply by pulling the two halves apart. A sleeping bad zipper is different in that you can separate the zipper without touching the toggle and closure by simply pulling the two halves of the sleeping bag apart. For that reason the HBS offers a snap on the front of the suit just below the waste so that when you begin opening the suit, the zipper does not go all the way to your feet. You want to be able to slide out of the bag just by bringing both hands through the zipper opening without actually having to fumble for the zipper toggle. Using a regular zipper for this task will leave you disappointed in the ability to get out of the suit with the least amount of motion, noise and effort. 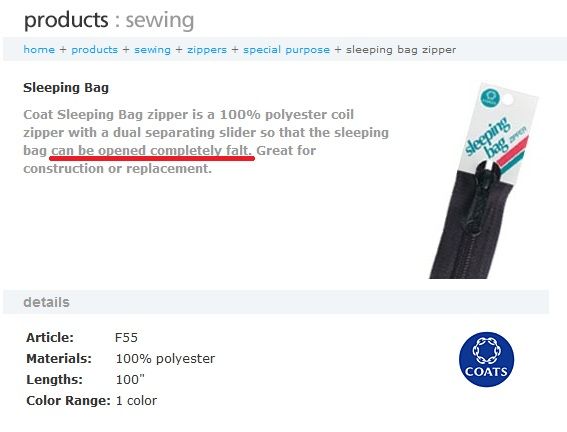 More on locking and non-locking zippers. Here are the layers of construction I’m using for this project. As the video I created states, I’m considering an additional layer of Polartec fleece. I just need to test the sewability of this many layers. When I join the two sides of the suit I would be sewing through 12 layers of fabric and insulation. 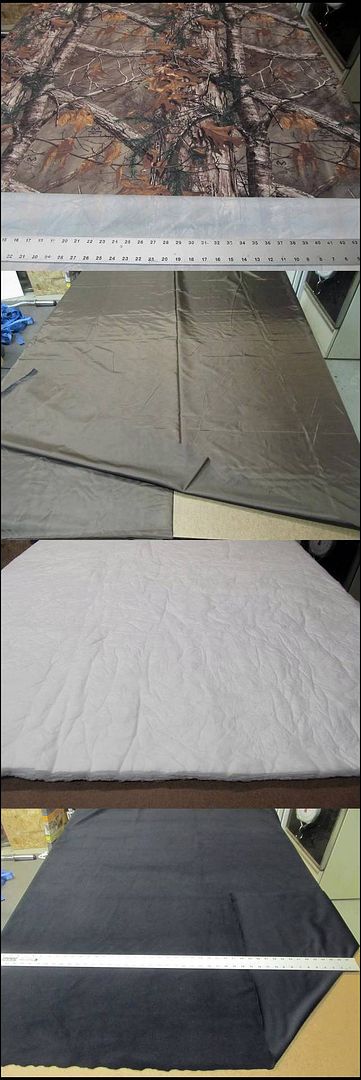 Video I created showing the layers. If you haven’t used a roll cutter you really need to. You wont use a scissors again. 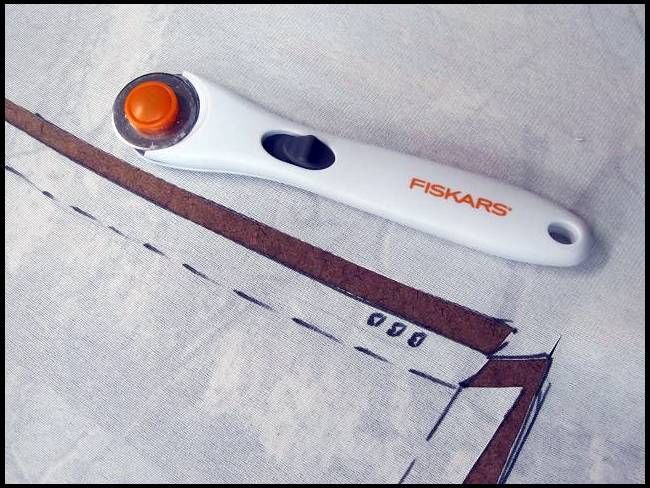 There is no turning back now. The good stuff has been cut. ;-) 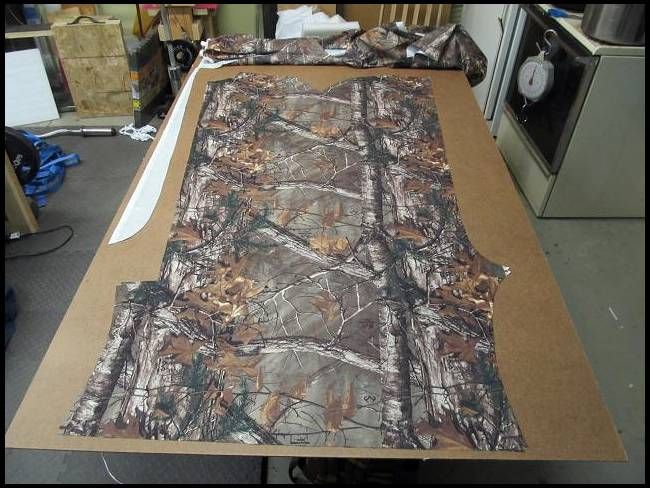 I dont think its possible to cut out polartec (or any stretchy fabric) in an elaborate pattern without using a roller cutter. A scissors just moves the material too much to make everything line up from the start of the cut to the end. A roller cutter is a close as one can get to using a cookie cutter with the least disturbance to the material being cut out. 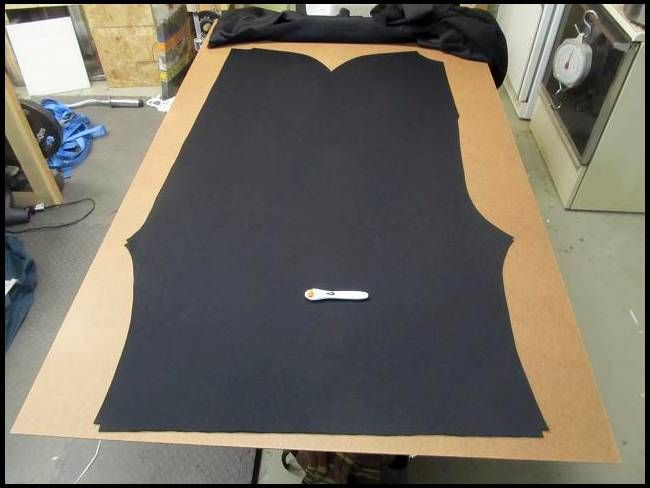 For info on this material click the link. polartec.com/warmth/You can buy it at Joann fabric stores now. They just started carrying it but other outlets also carry it. Joann had it for $9 a yard but seems to have lots of 50% coupons that you can print out from their website. Good Lord did that last part sound geeky or what? Hopefully that feeling wears off when I am on my manly bow stand with my manly bow killing big game animals in a manly manner. ;-) I’ll update as I make progress. |
|
|
|
Post by Ron on Dec 12, 2013 16:50:19 GMT -6
With all the many pieces of all the layers cut out I had to do a process check trying to sew through this many layers. As stated, the suit is made up of 6 layers but joining the panels together requires sewing through two panels or 12 layers of fabric. That’s a lot to ask of this old Singer so I need to test it on a scrap piece. The data sheet on the 3M Thinsulate web site says that Thinsulate needs to be quilted into the garment and that too much sewing compresses the loft causing a loss in insulation efficacy so they state that quilts ought not be closer than 4 inches but can be as much as 10 inches apart. (too far apart and the Thinsulate in not supported enough and will come apart during machine washing. Thinsulate needs support but not so much you lose the air trapping loft that makes it so effective. I cut a 1 foot by 1 foot square of the 6 layers and set on a quilting distance of 5 inches apart in a square pattern. The Singer had no problems sewing the 6 layers. 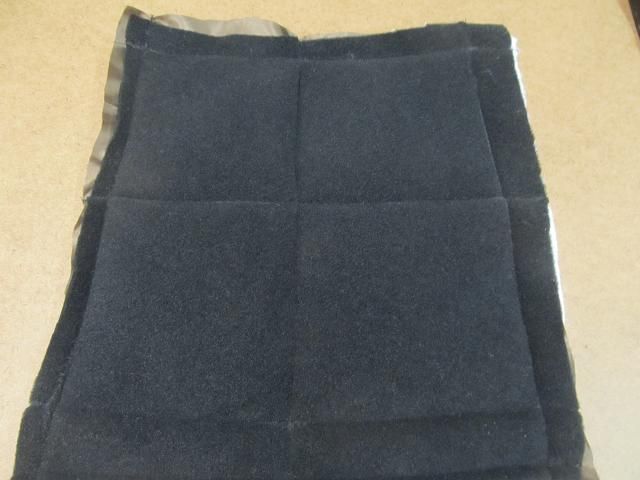 Then I cut the test piece in half and stacked them to test sewing through 12 layers. It was slow going and I had to make some adjustments but I was able to sew through all of it. So far so good. Im pleased with the results. Again the layers in order are Camo polyester tricot Polartec fleece Ripstop polyester 3M Thinsulate 150 Ripstop polyester Polartec fleece 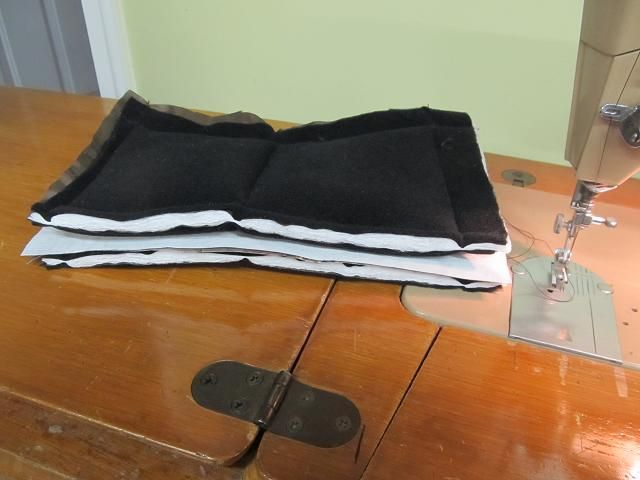 Its clear that there is no way the wind is going to be able to cut through this stack of fabric. I then bent, folded and manipulated the stack while holding near my ear and it is as quiet as a bed quilt. Then I threw the test piece in the freezer for an hour and tested it for noise again. Still its very quiet. All systems are go. 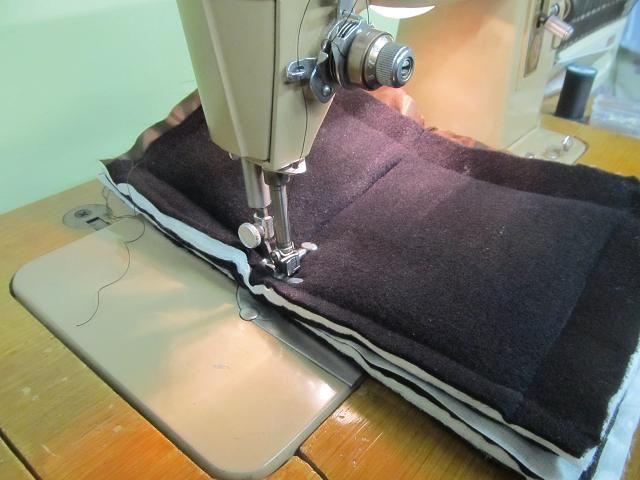 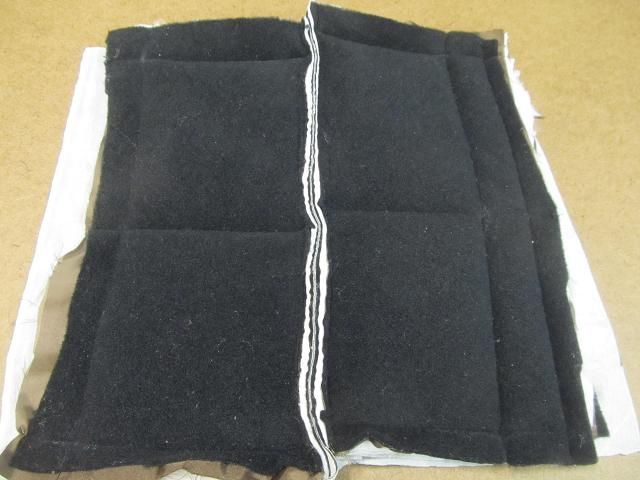 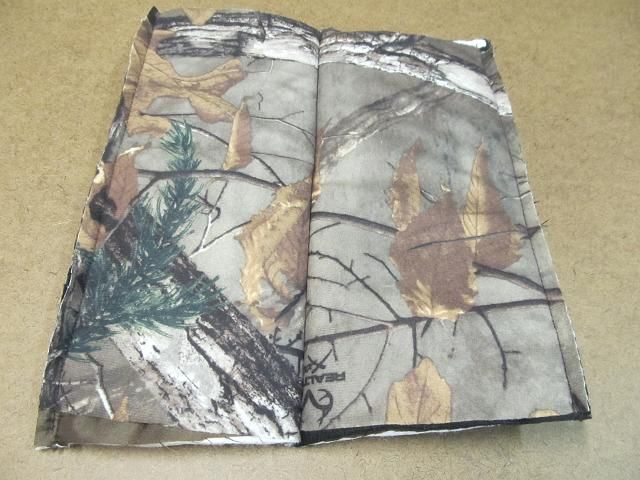 |
|
|
|
Post by Ron on Dec 13, 2013 9:03:58 GMT -6
I get colder, My hands and feet seem to be the most effected and for some darn reason my nose runs like crazy when Im cold on stand now. That never used to be the case so Im not sure what caused that. I dont think I lost that much weight in my nose.
|
|
|
|
Post by Ron on Dec 13, 2013 10:38:38 GMT -6
The Heater Body Suit shipped to my door would be about $400. I would make sure to use it to get my monies worth at that price.
I understand my head is still pretty big (lots of grey matter and cranium power in that crank case) but whats with the runny nose thing? That one has me stumped. Could i t be all that awsome brain matter doenst leave room for snot?
|
|
|
|
Post by Ron on Dec 14, 2013 8:18:14 GMT -6
I started assembling the suit at the feet. None of the brands/versions of the suites that I have seen offer a thinker and more durable fabric as the sole of the suit. My ladder stands and chain on have expanded metal that is rough with sometimes weld spatter that I fear will tear the out camo fabric so Im adding a layer of PU coated 500 denier Cordura to the bottoms of the feet. I sewed the Cordura to the outer fabric prior to attaching the outer fabric to the quilted foot panel. U ran 3 stiches around to reinforce the Cordura patch. The PU (Polyurethane ) coating on the back side of the Cordua offers a bit of water resistance. 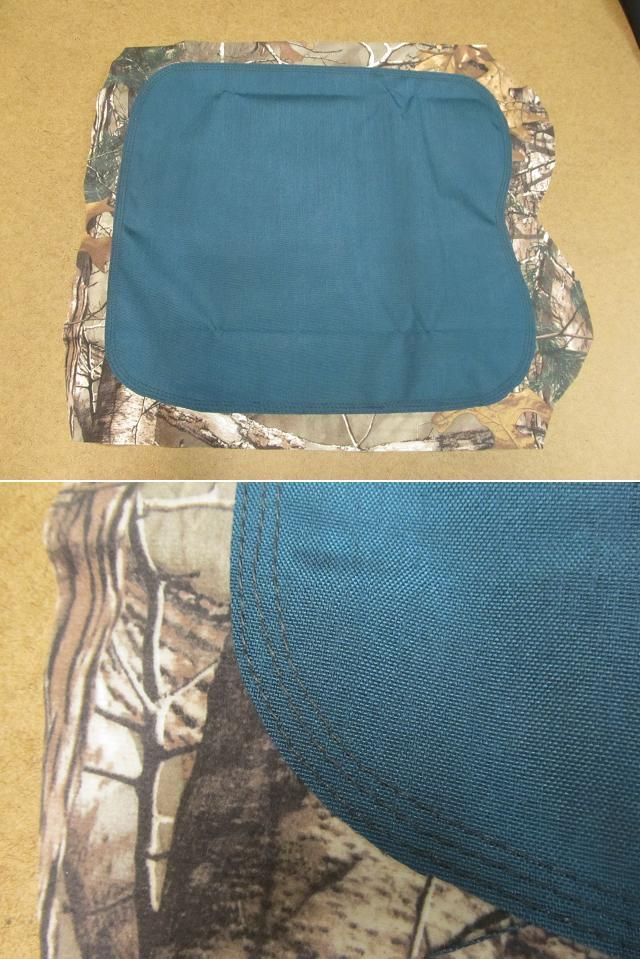 The next step was to quilt together all the many layers for the boot panel prior to attaching the outer fabric. Then the outer fabric is attached to the quilting only around the seam. This does two things. It keeps the quilting stitches from being seen (important if I didn’t want the fashion fabric to show the quilting stitches) but it also reduces the number of needle holes through the outer fabric from wind and water standpoint and it keeps the quilting threads from being abraded through wear or snagging on anything. THe outer fabric and quilting are folded in half inside out and then sewn. 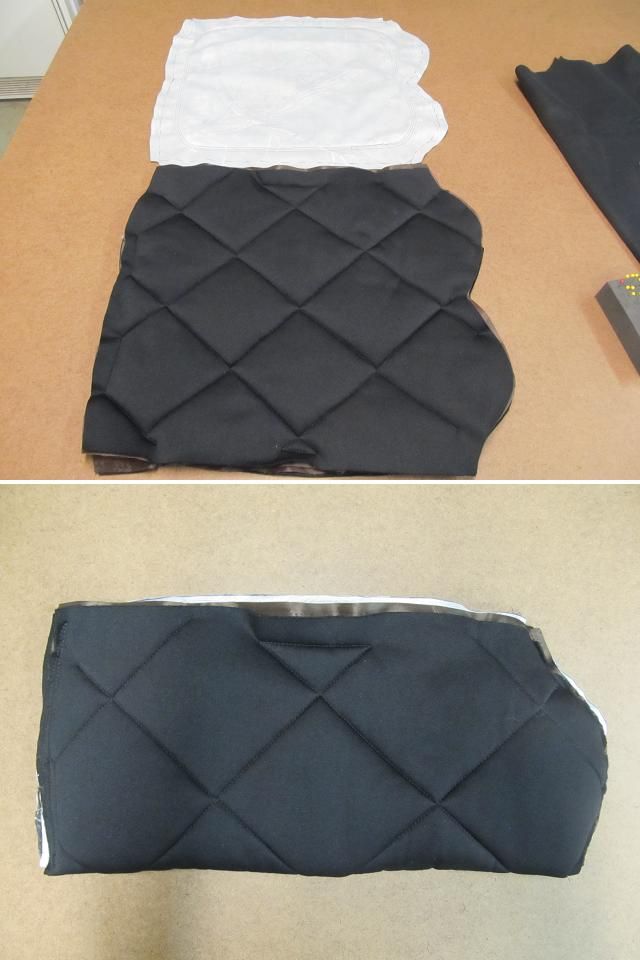 After sewing this is what it looks like when turned right side out.  I used one of my size 13 Extra wide boots to see how it fit in the foot portion. There is room to spare. 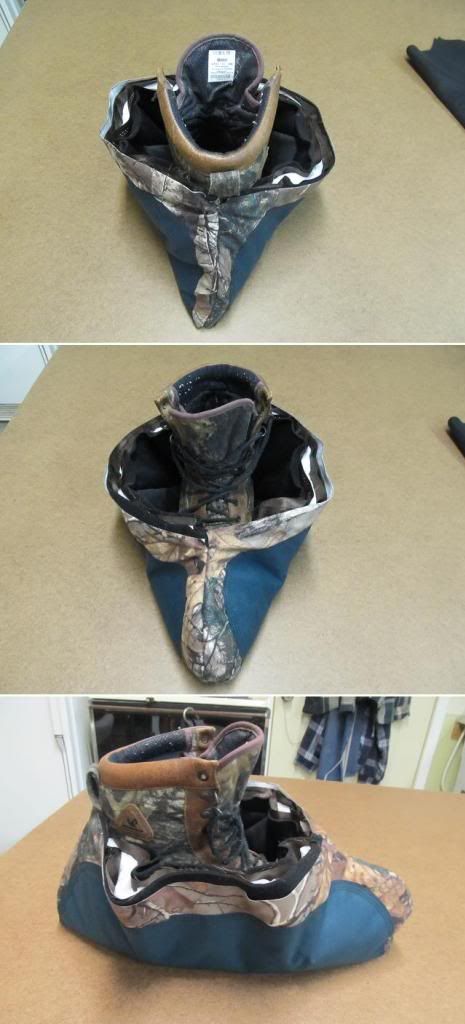 |
|
|
|
Post by Ron on Dec 14, 2013 11:31:24 GMT -6
I have come to the conclusion that quilting large panels is a pain in the butt and time consuming. But I have one side of the suit quilted anyway. One down one more to go. If I do this again Im switching from 5 x 5 quilts to 7 by 7. 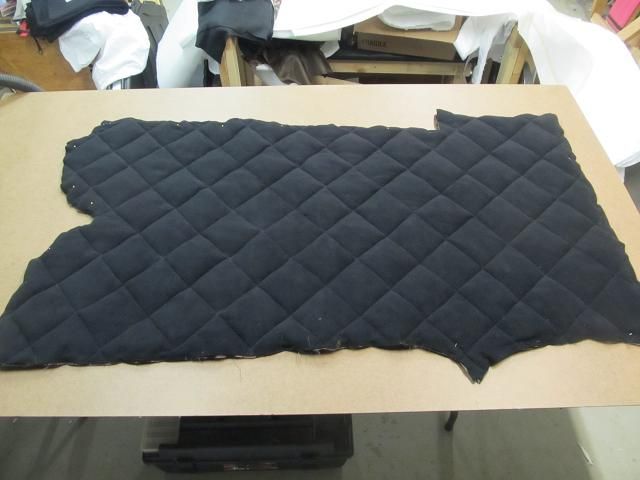 |
|
|
|
Post by Ron on Dec 15, 2013 14:59:27 GMT -6
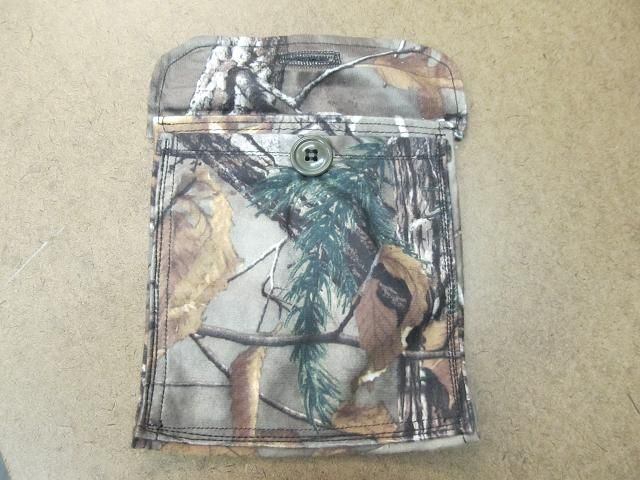
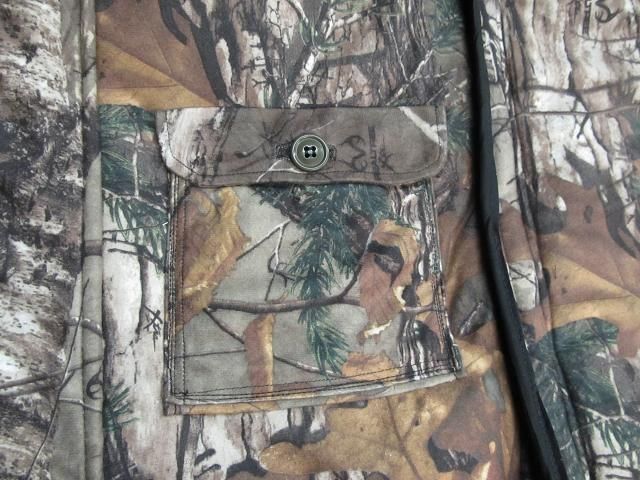
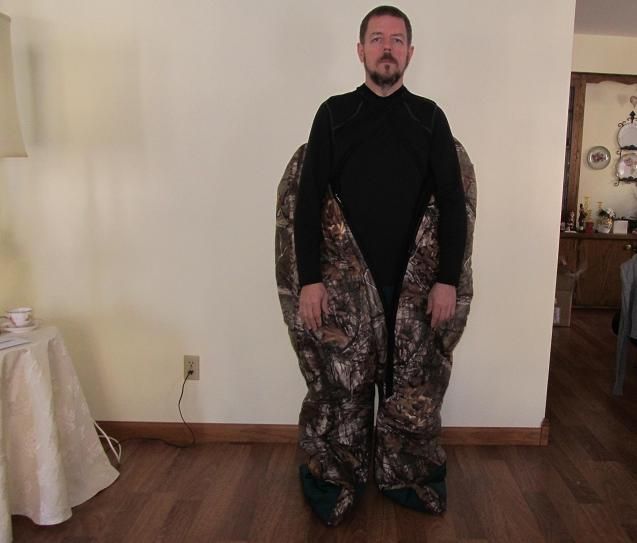
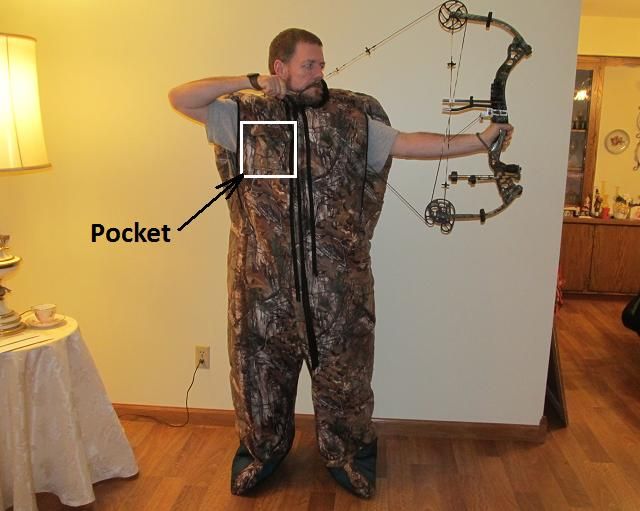
The suit will be held up on the shoulders by crossing elastic straps. It will be easier to sew the straps in before the bag is assembled. There will be a strap on each half of the suit. 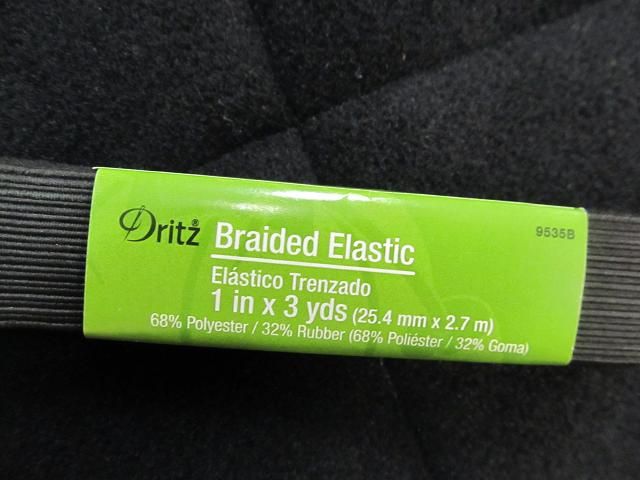 The top strap is 36 inches long and the bottom is 6 inches. A buckle allows for adjustment. 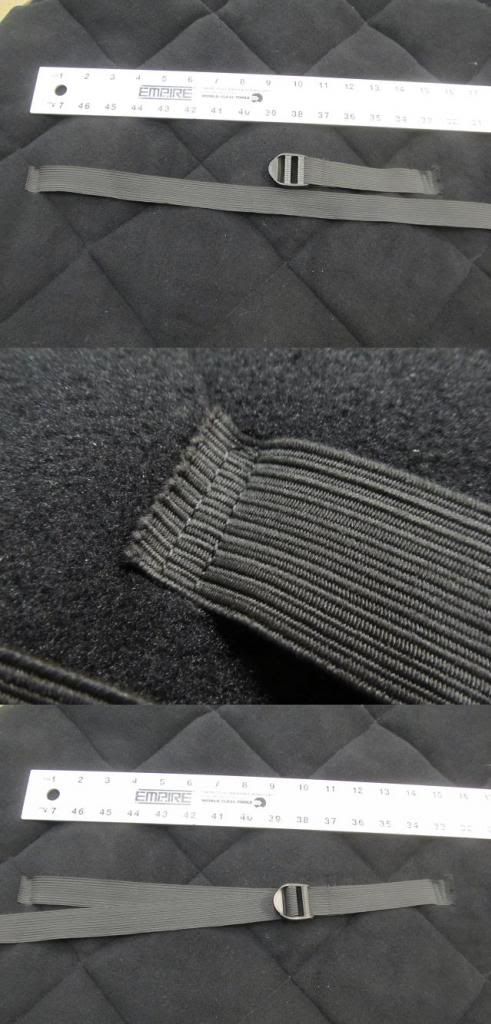 Next, this bag will have both a main zipper and additional zipper for each arm like they have on the warm bag suit. I didn’t pin the zipper in place since the suit it getting thick/bulky for pinning so I used painters tape to position it .It does a good job and does not leave any sticky goo on the fabric. You can sew right through the tape and then peel it off, then open the zipper and use the rolling cutter. 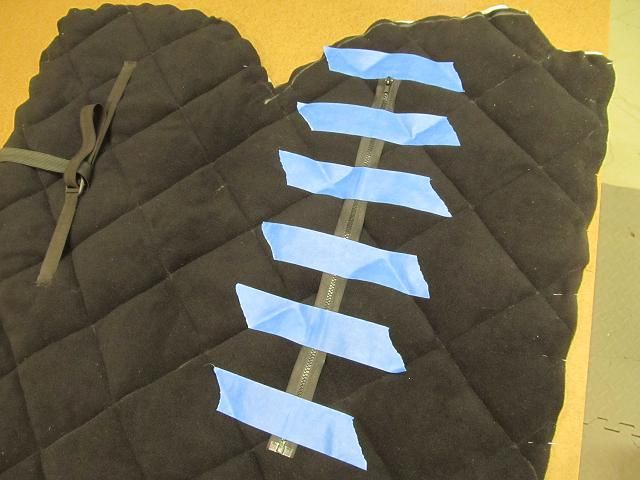 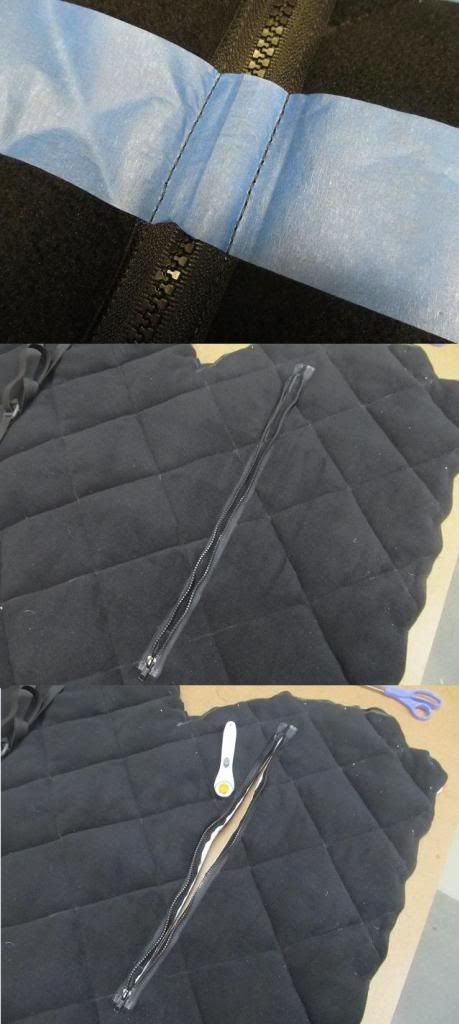 Then the suit is flipped over and the outer material is resewn to the zipper. Then I made a zipper cover/flap to keep the warm in and wind and rain out. It’s two layers of the camo fabric and two layers of the polartec fleece stitched together. The flap is then sewn over the zipper opening. 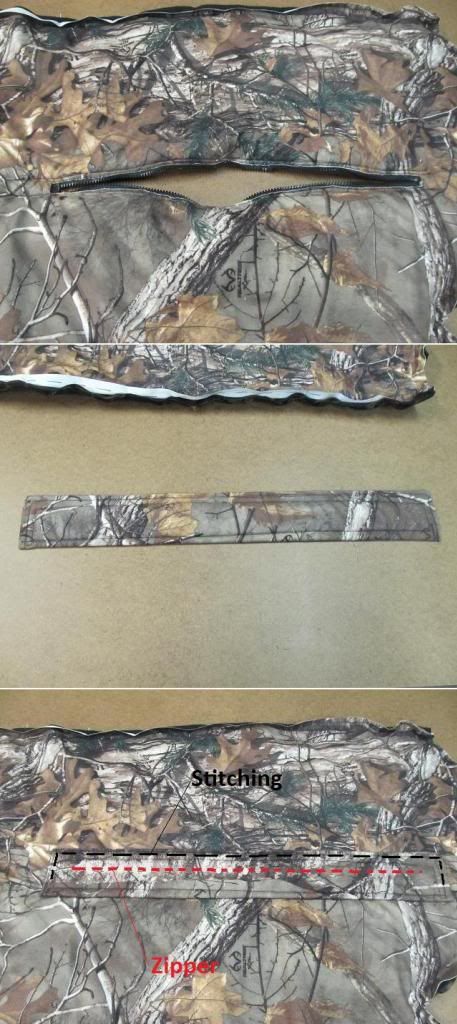 |
|
|
|
Post by Ron on Dec 16, 2013 16:52:03 GMT -6
I took a break from sewing on Sunday to get together with my brothers and dad to move my dad’s tower/gun stand to my sister’s farm. My uncle sold the family farm so the stand needed moving. It was only 5F with a wind so it was pretty cold for this kind of work. My dad (78 years old) could only watch from the cab of my truck. A few years ago he had a heart attack and 5 stints installed and last fall, 80% blockage in his carotid artery and about a month ago carpal tunnel surgery. The meds he is on means he can’t tolerate the cold. He told me that he wished he had a hat that kept him warm and had ear flaps that also keeps his cheeks warm. He likes to ice fish but its been a very windy fall/winter and the wind on his ears/face make it too uncomfortable for him. I told him I would make him an insulated hat with ear and cheek flaps even though I have never sewn a hat before. So I put the warm suit on hold for a day to make him a hat. Im making the hat out of an army surplus wool blanket, Polartec fleece, ripstop polyester (to block the wind) and polyfill batting/insulation for warmth.  Step one is to make a pattern for the lower part of the hat. 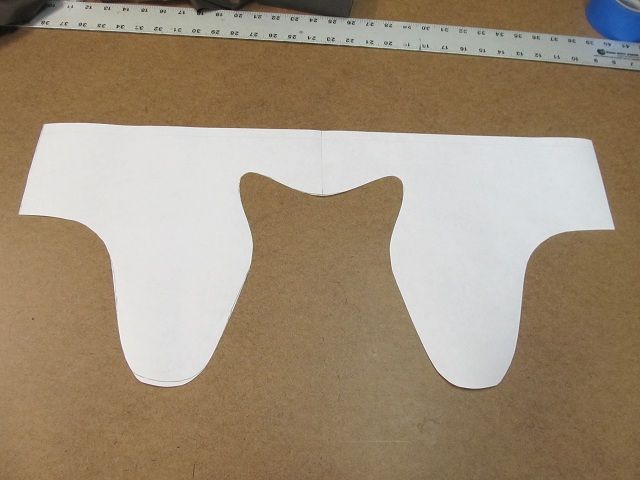 The material is sewn inside out so I stacked it with the fuzzy side of the fleece and the wool next to one another and then layered the ripstop and polyfill on top. Once sewn it will be turned inside out . Here is what it looks like from both sides after sewing. Its sewn on all sides EXCEPT the top of the headband portion so I can turn it right-side-out. 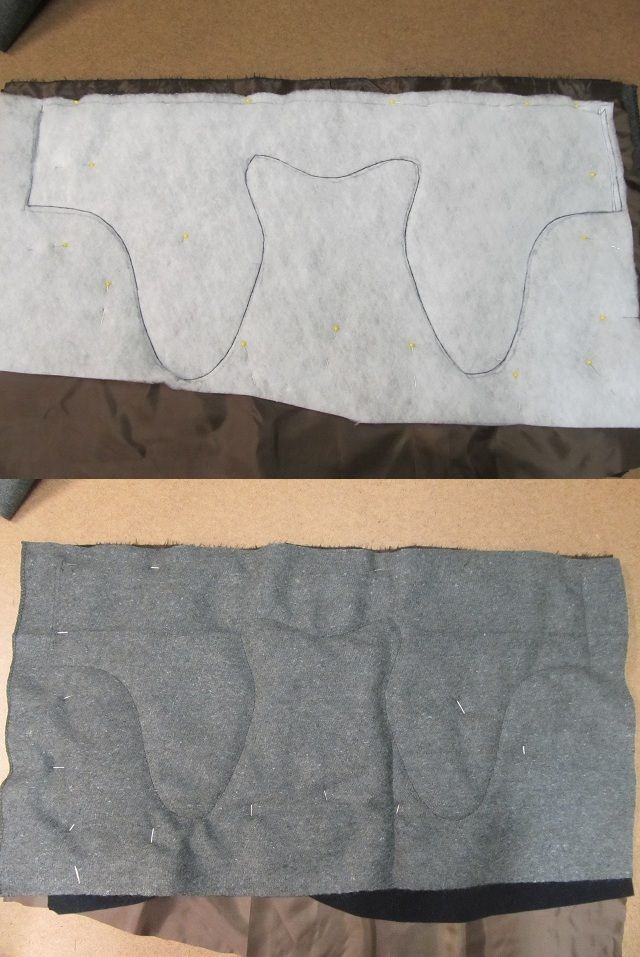 Here is what it looks like when stitched . 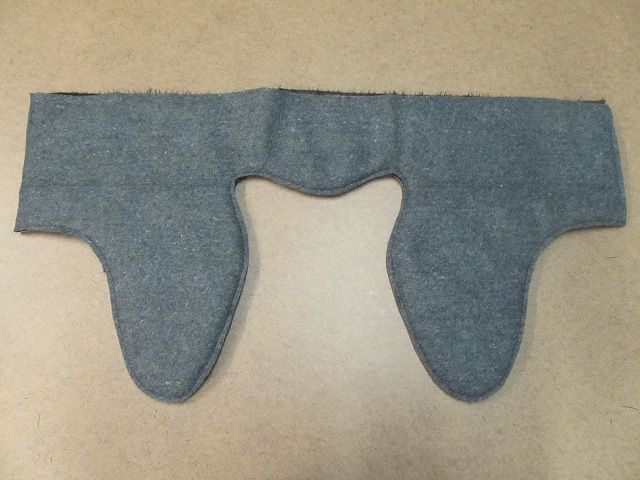 Then all the layers except the wool are cut away and the wool is folded back on the headband portion. 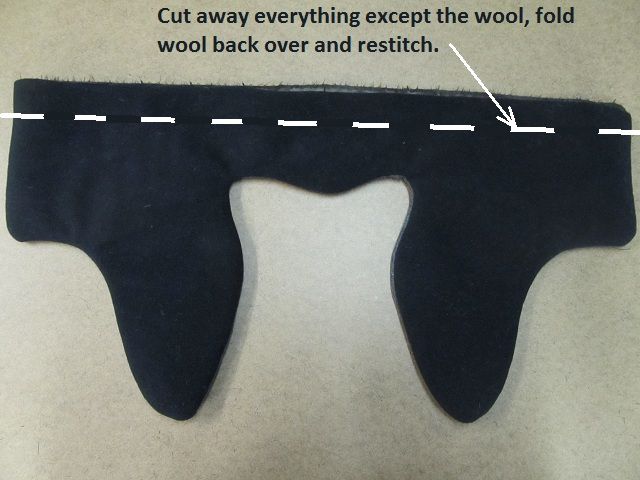 After wrapping it around my head and testing the fit in the mirror I decided to remove the bill/brim. I thought it would fold up/down but I think I would need to make it bigger for that to work so I just removed it. 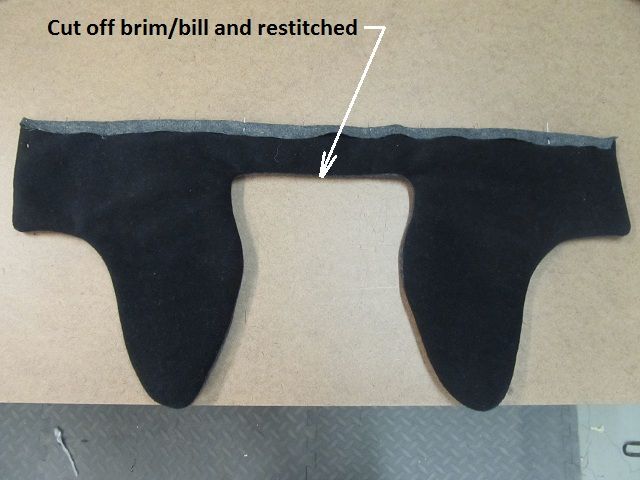 Then I made a pattern for the beanie portion of the hat. 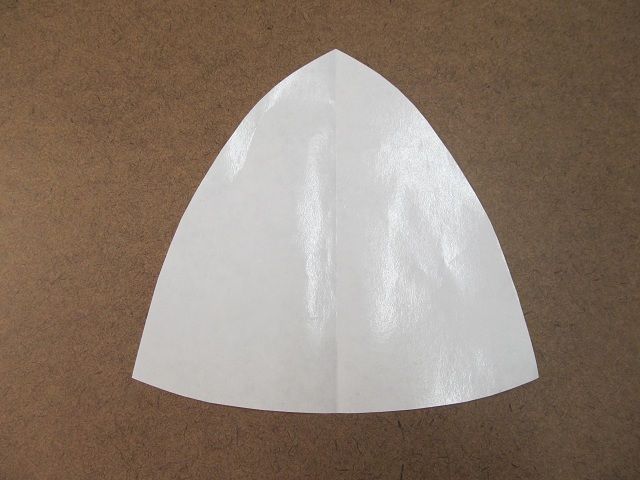 The 4 panels of the beanie wont be turned inside out so I sewed them in the order I want them to appear on the finished hat. 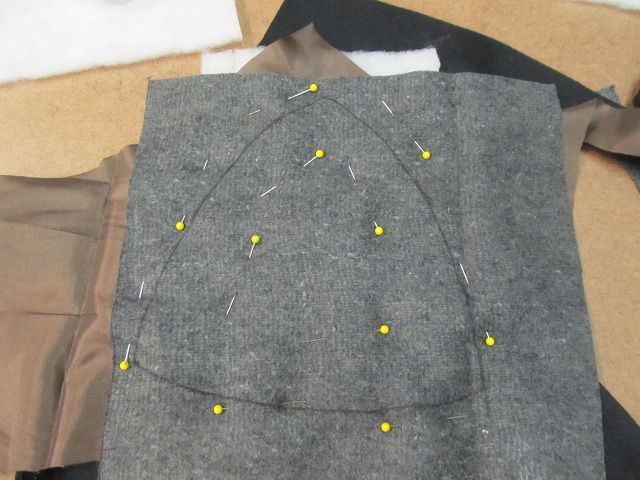 This is what the two sides look like after stitching. I quilted it in the center of each panel. 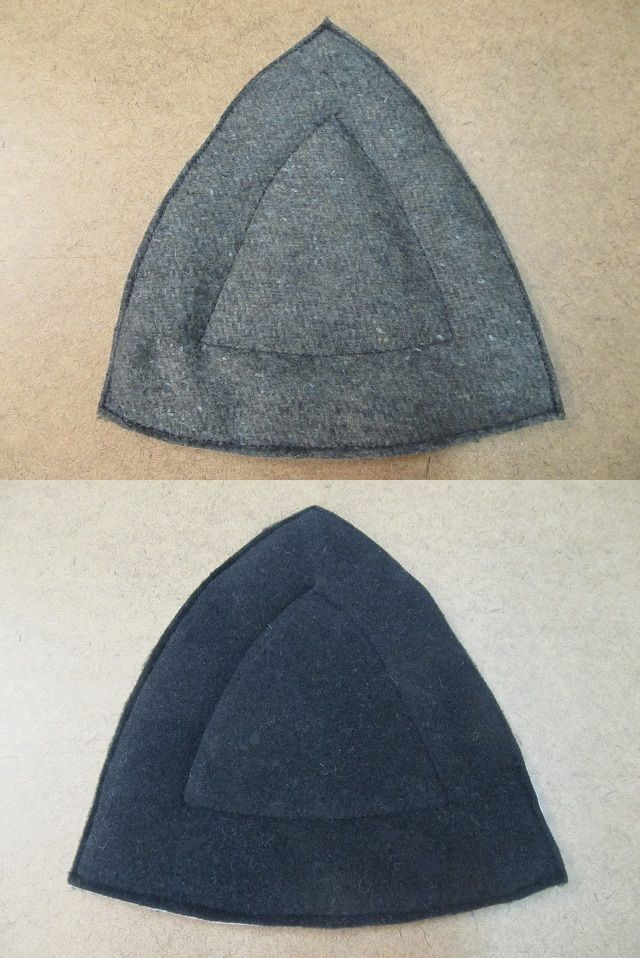 Then the 4 panels are sewn together to form the top of the hat. 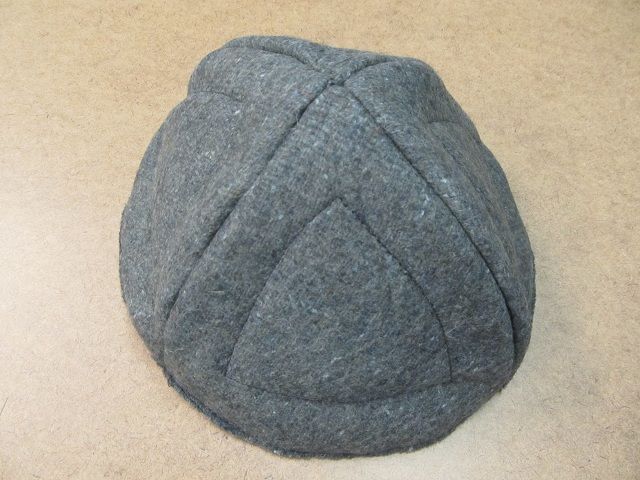 Then the bottom portion and beanie are pinned together for sewing. 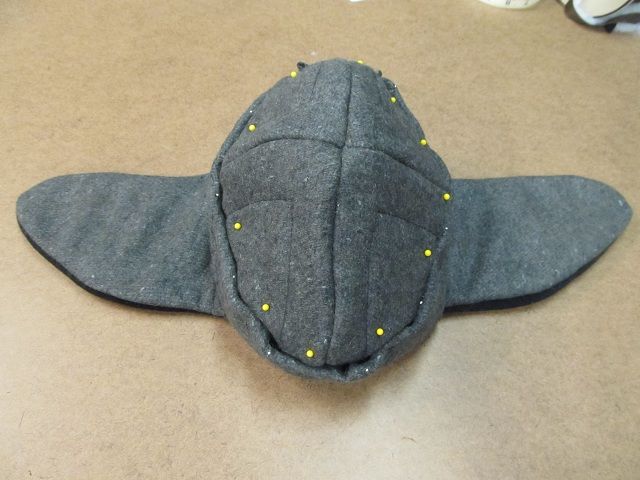 And after stitching with the addition of a black fleece headband sewn on. 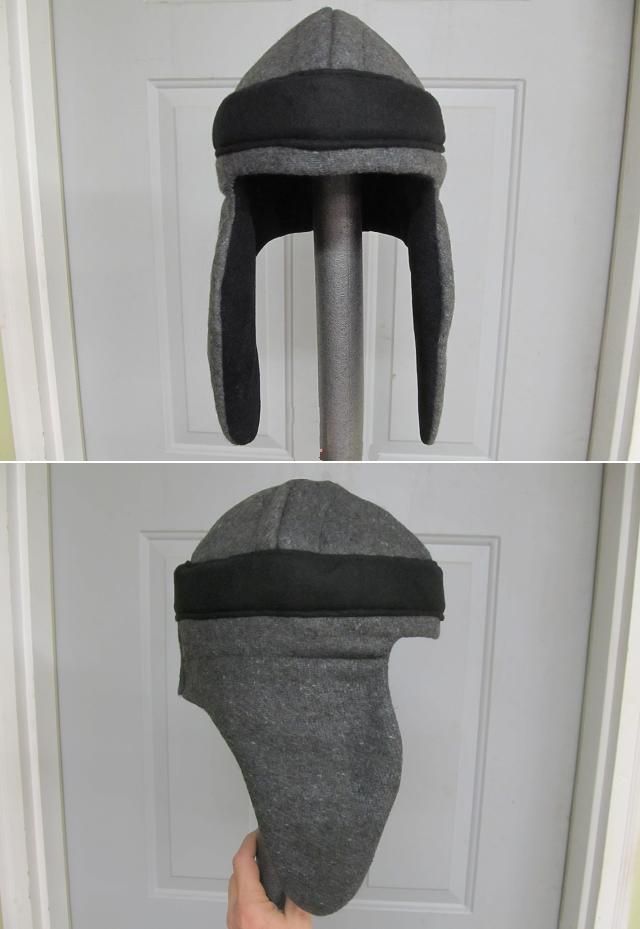 Then Velcro closures. 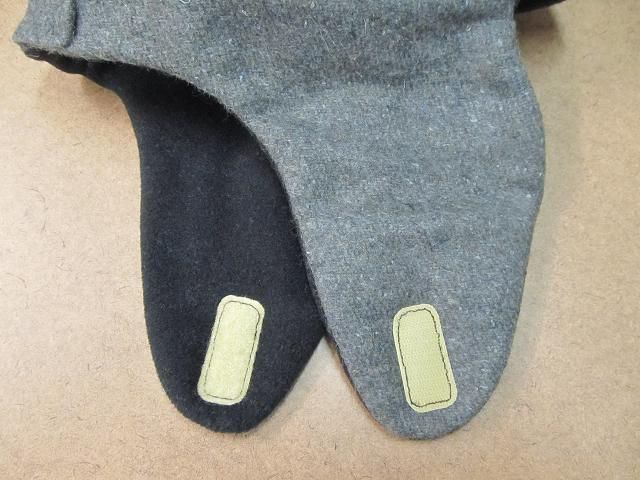 And proper labeling 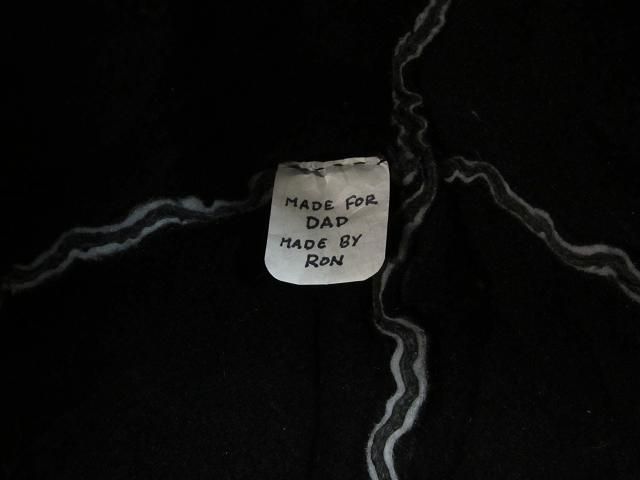 My youngest was not really excited about being my hat model but he did it for grampa anyway. Time to wrap it for Christmas. 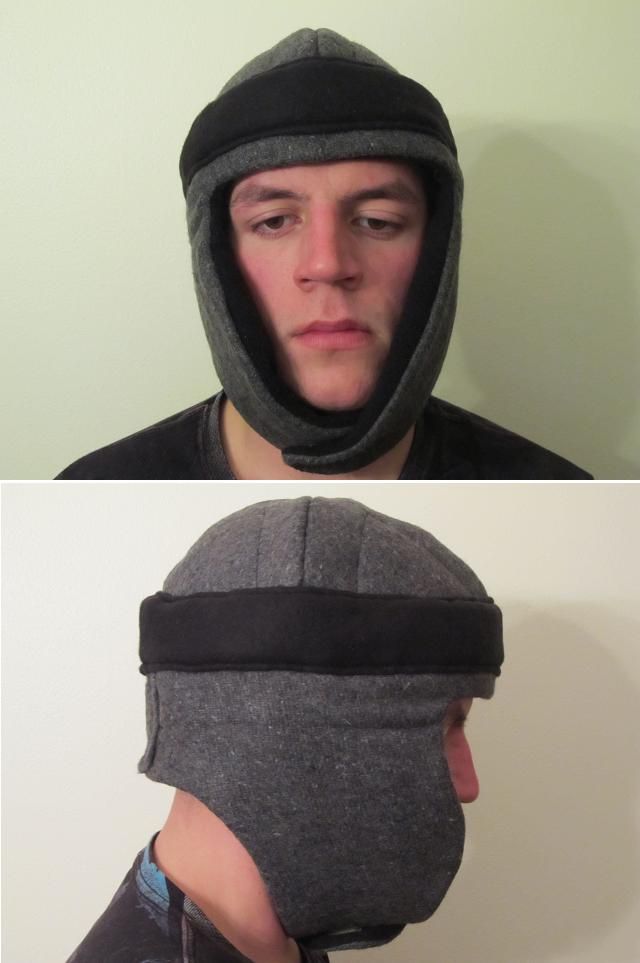 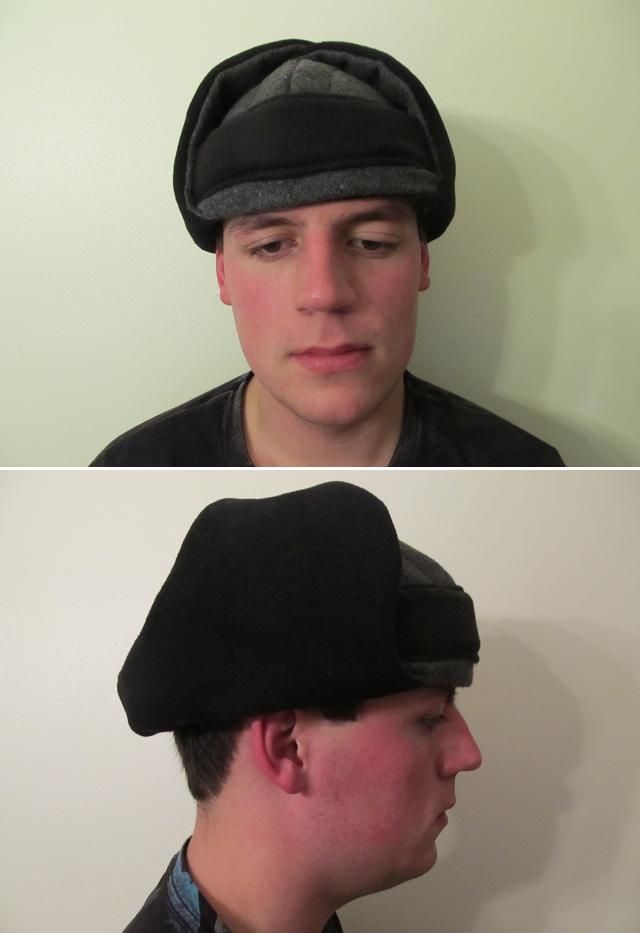 OK, Enough with the hat. Time to get back to the suit. |
|
|
|
Post by Ron on Dec 16, 2013 18:53:23 GMT -6
My middle name is George. I dont get the Nancy ref since it sounds like a TV thing. I cant sew and watch TV or I will stitch myself to the suit.
|
|
|
|
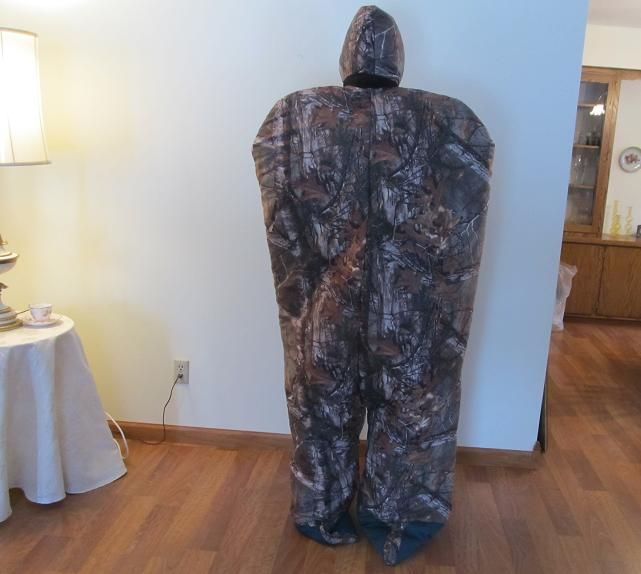
Post by Ron on Dec 23, 2013 15:00:28 GMT -6
After a few days out of town I got some time to work on the warm suit. I completed both side and then joined the two sides together. The most difficult area is the crotch as there is the most material to sew through. It worked out well and the pattern is sound. 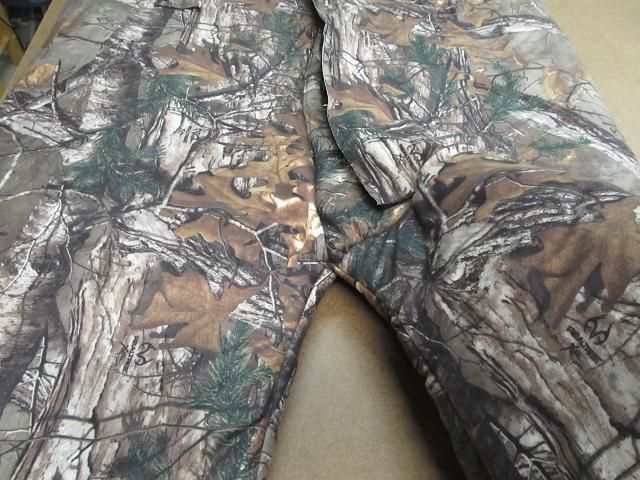 Then I added the first foot to the bottom of one of the legs. That too worked out well. 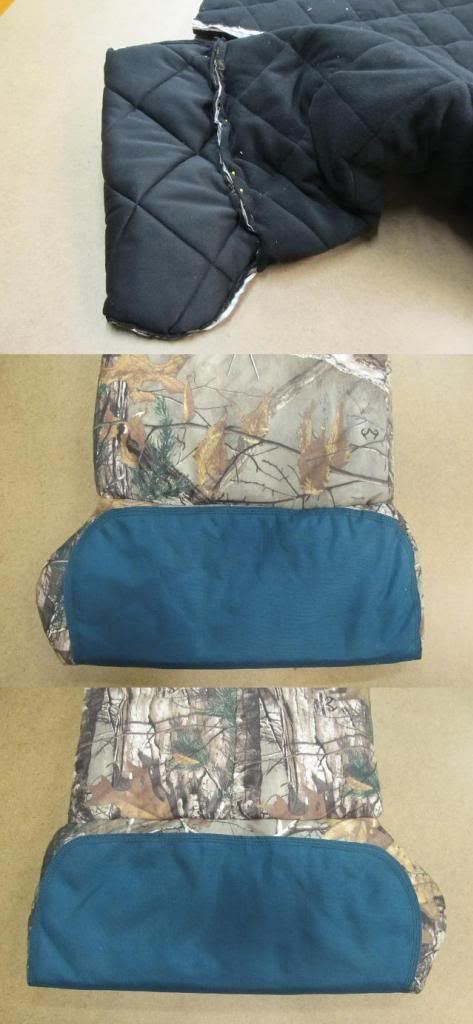 The pieces are coming together well. Another foot to add and the main zipper and the collar to go yet. 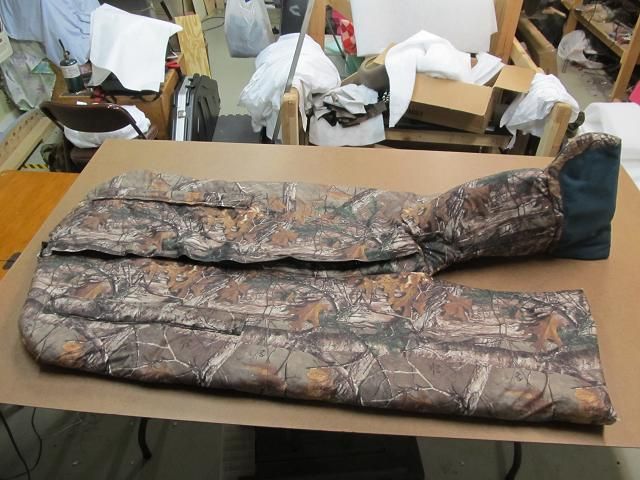 |
|
|
|
Post by Ron on Dec 24, 2013 8:51:30 GMT -6
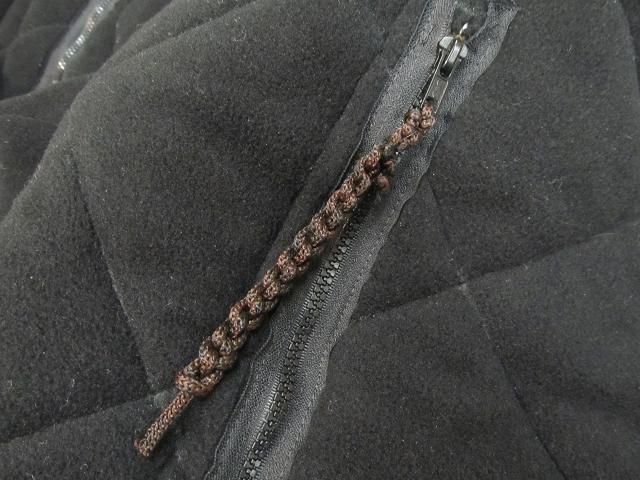
With both feet attached I turned to the main zipper and the flap on the suit that covers it. The flap is finished with what is called Bias tape with is just a folded piece of fabric to dress up and finish the cut edge of the layers of material on the main zipper flap. 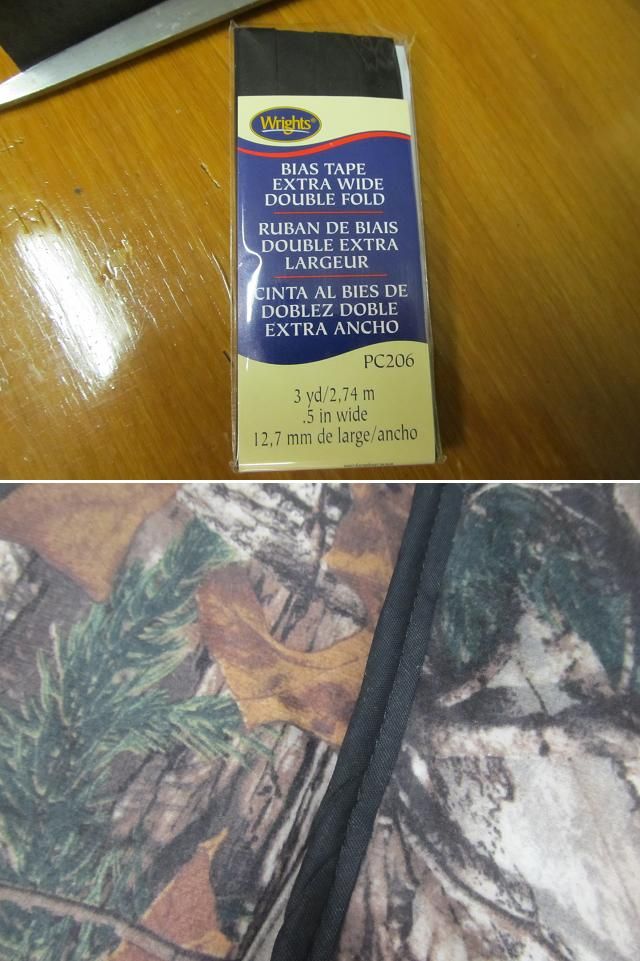 Then I sewed the main zipper to one side of the suit. The other half of the zipper gets sewn to the flap about 2 inches inside from the edge of the protective flap. 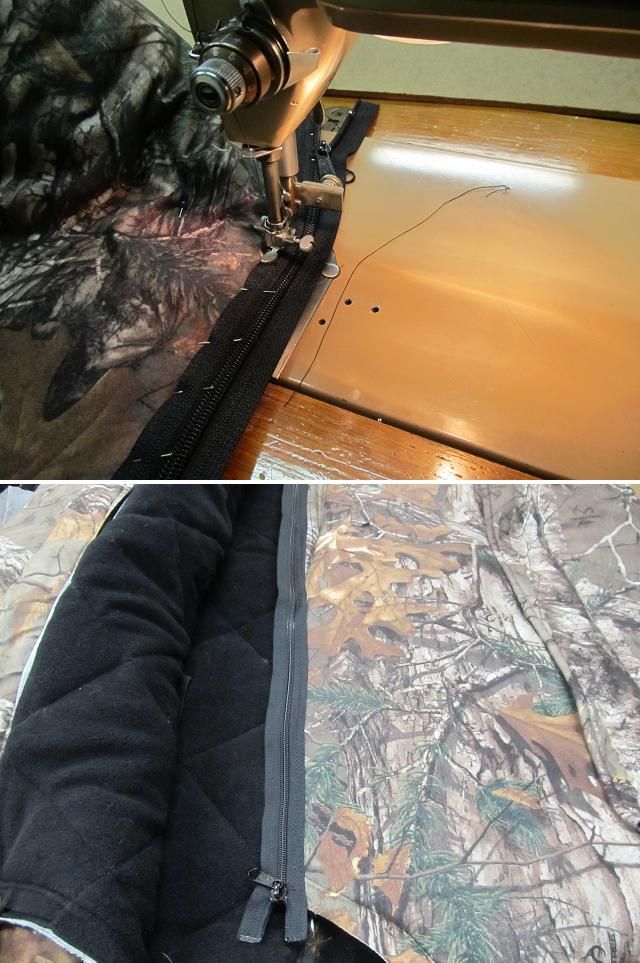 |
|
|
|
Post by Ron on Dec 24, 2013 14:24:00 GMT -6
Sweet video. Thats me. Rocking the Singer 404.
|
|
|
|
Post by Ron on Dec 27, 2013 14:55:25 GMT -6
The hat works! He opened it for Christmas and put it to use right away. 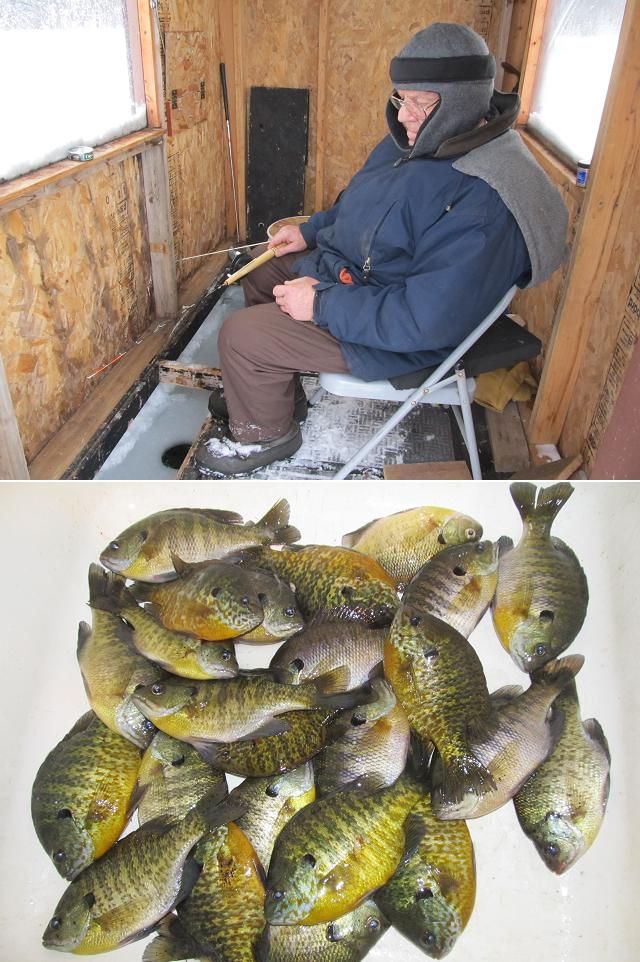 |
|
|
|
Post by Ron on Dec 28, 2013 8:41:51 GMT -6
|
|
|
|
Post by Ron on Dec 29, 2013 9:38:36 GMT -6
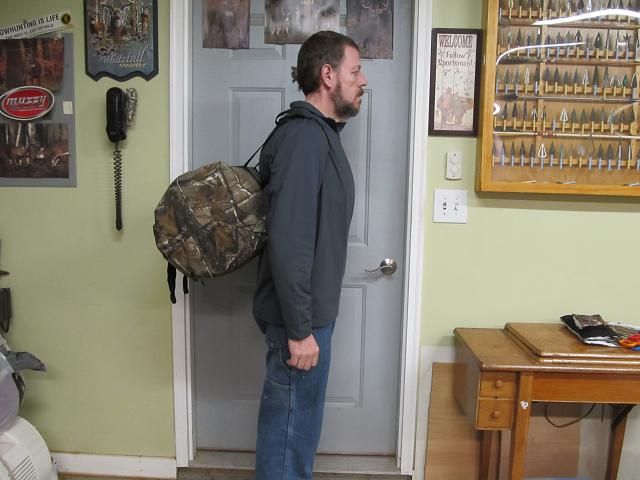
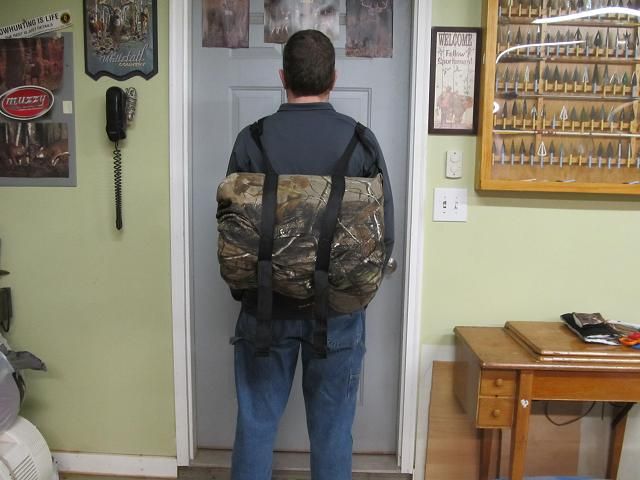
The suit needs an easy and convenient way to transport it in and out of the woods and since I am prone to leaving things up in the tree overnight and I like to take things for gun hunting into the stand the day before, I want a bag for the suit to protect the suit from the elements. The bag has a few requirements. The inside needs to be slippery material making it easy to get the suit in and out. It needs to be waterproof. It needs to have back pack straps sewn in. I found some heavy Twill fabric with the same camo pattern as the suit at Joann fabrics. I will line the bag with ripstop nylon since its slippery and water resistant. When finished the bag will get a durable waterproof coating sprayed on the outside. 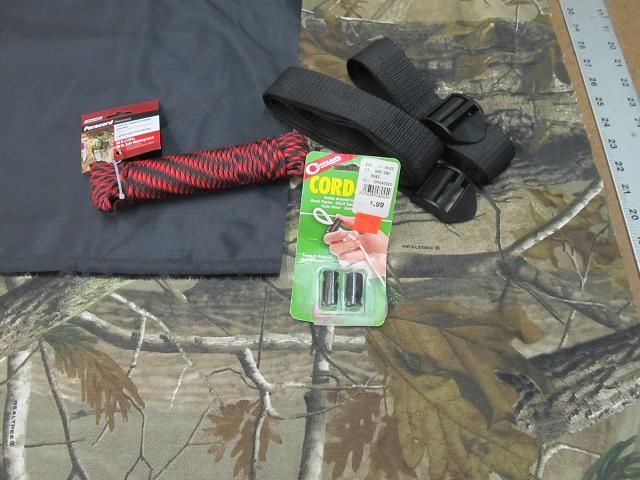 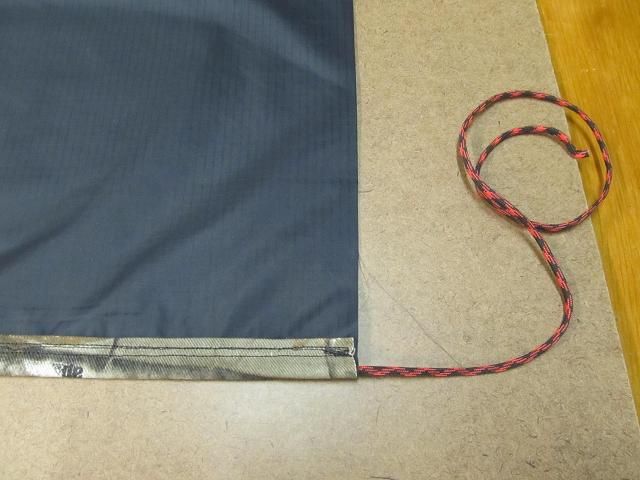 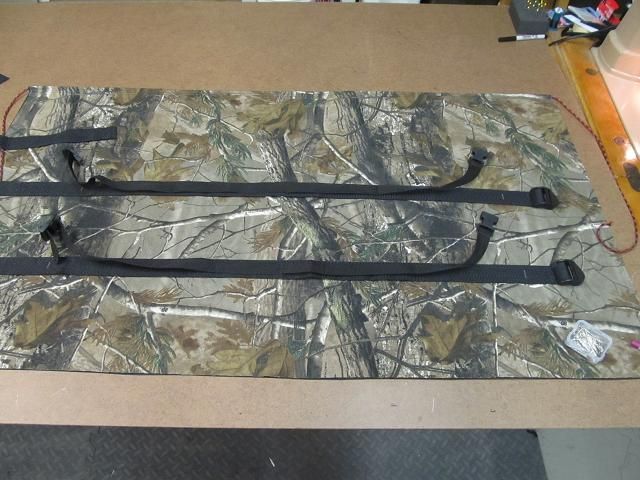 The bag is then turned inside out and double stitched for strength. Afer sewing I turned the bag right side out and I put the suit in the bag to test for fit and to address the bottom of the bag. Since the bag is round when the rolled up suit is placed inside but the bag is a flat envelope, you get corners that stand out. This is fine if you are making batman’s head piece and want bat ears. I don’t want that so with the suit in the bag I pined the ears down, removed the suit and sewed the ears flat. 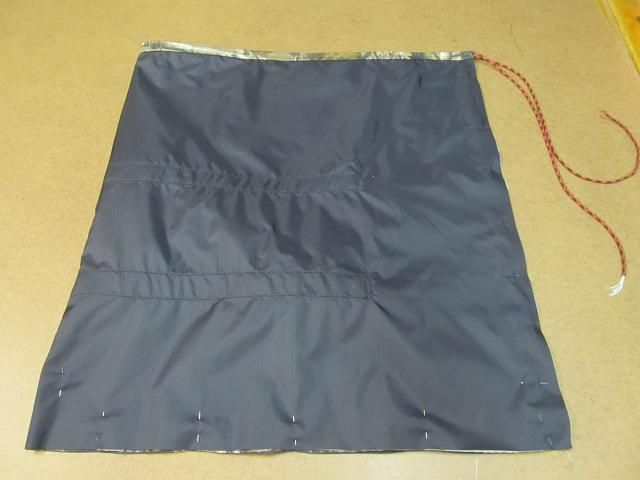 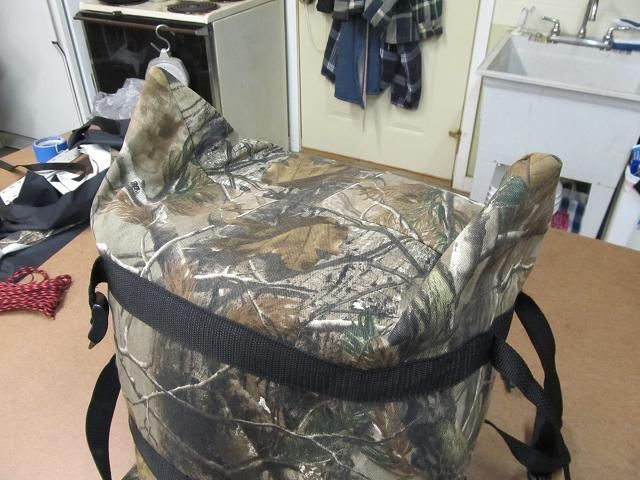 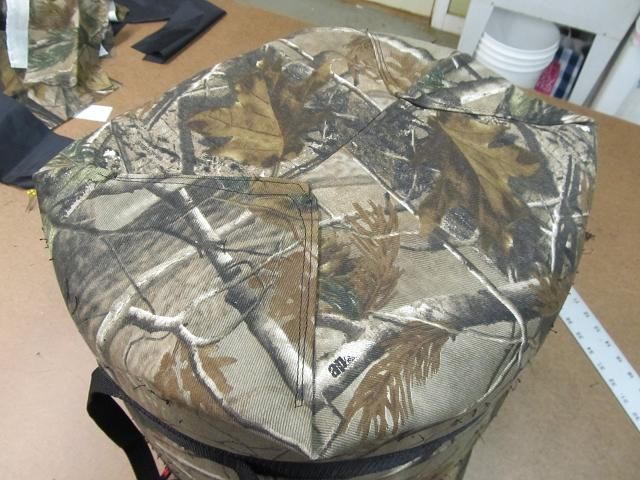 Here is the finished bag with the suit inside. The backpack straps are adjustable as are the cinch straps. 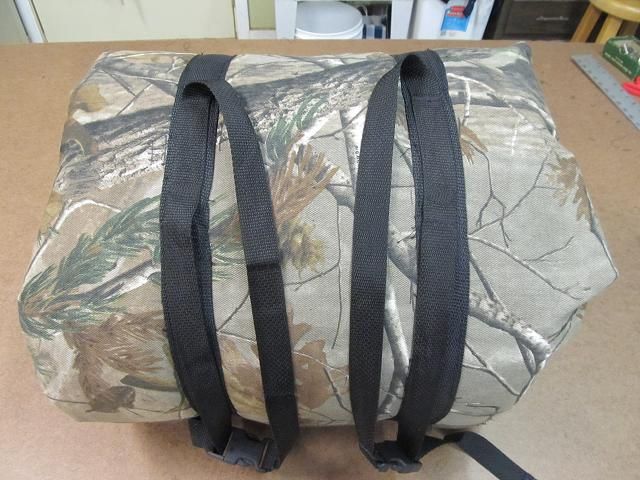 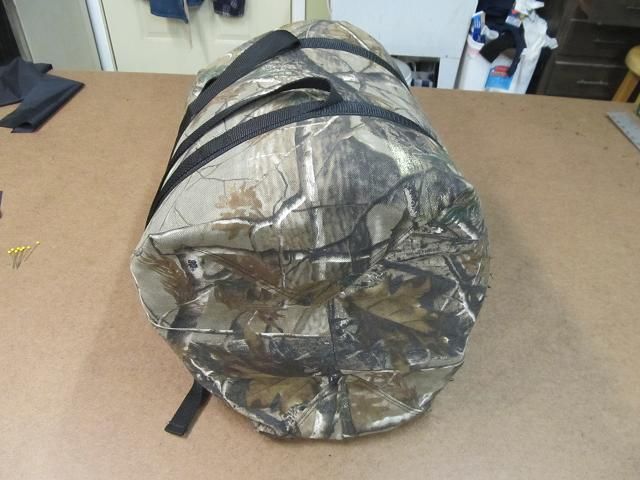 |
|
|
|
Post by Ron on Dec 29, 2013 10:49:41 GMT -6
I have the option of using Ozone (O3) scent removal technology within this suit. I have a few of these units that I use in my homemade wardrobe to deodorize all my gear but since this suit in itself is a contained enclosure, I have the ability to use the O3 unit to kill my scent within the suit meaning my head would be the only thing outside the bag giving off scent. The unit runs on 4 AAA batteries and is small and light enough to hang within the suit without any bother. The heater body suits that are purchased all come with the same O3 unit. (See link)  www.heaterbodysuit.com/SeriousHunterSolutionVideo.html www.heaterbodysuit.com/SeriousHunterSolutionVideo.html |
|
|
|
Post by Ron on Dec 29, 2013 19:10:58 GMT -6
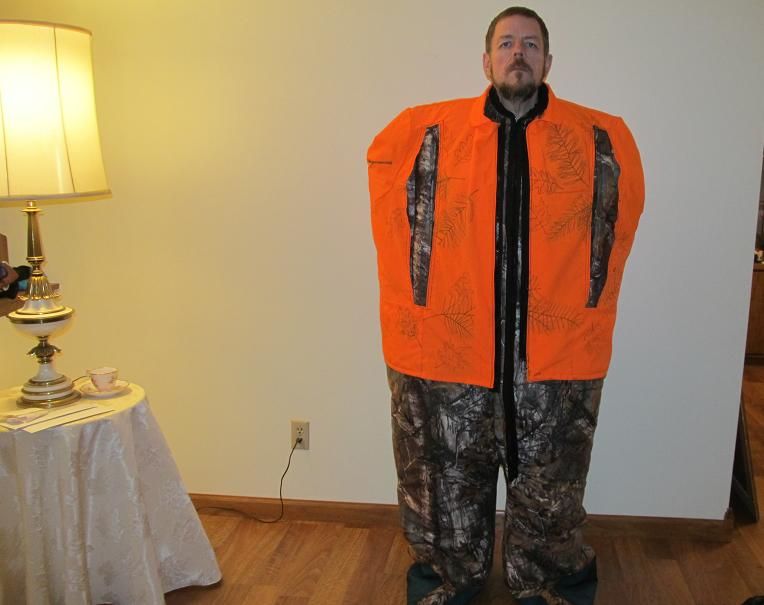
This year’s gun deer season was pretty cold and windy and what drove me to the construction of this suit in the first place so the suit needs a blaze orange shell . Obviously the shell needs to be removable with as little hassle as possible so I repurposed a 3XL light weight orange shell I used to wear when I was much bigger. (being a lot smaller is another reason I needed the warm suit since I get colder now that there is less of me) I cut the arms off the old orange jacket and sewed them shut. Then removed the zipper and placed one half of it in a new location on the jacket and sewed the other half of the zipper to the suit. I had to buy another zipper for the other side of the jacket and again sewed one half to the jacket and the other half to the suit. I also had to cut and hem openings in the jacket that line up with the arm openings in the suit. Not having to construct an entire orange shell saved a bit of time. 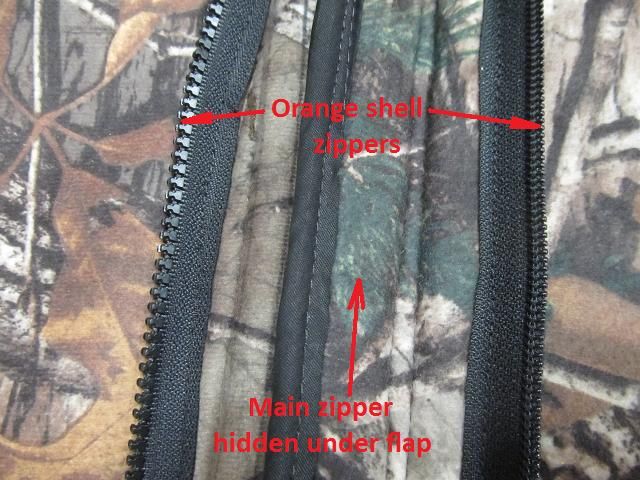 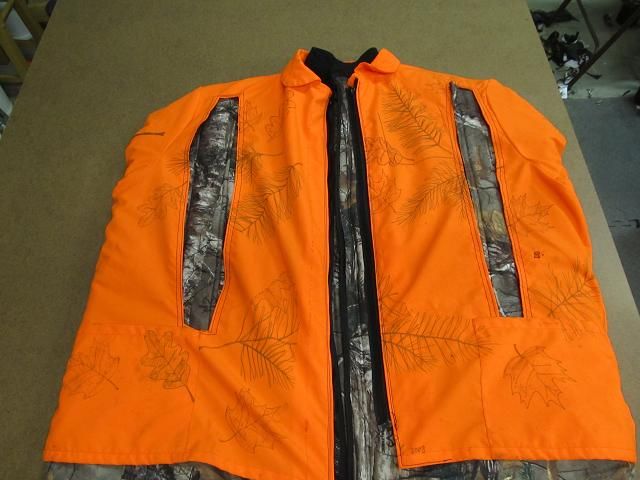 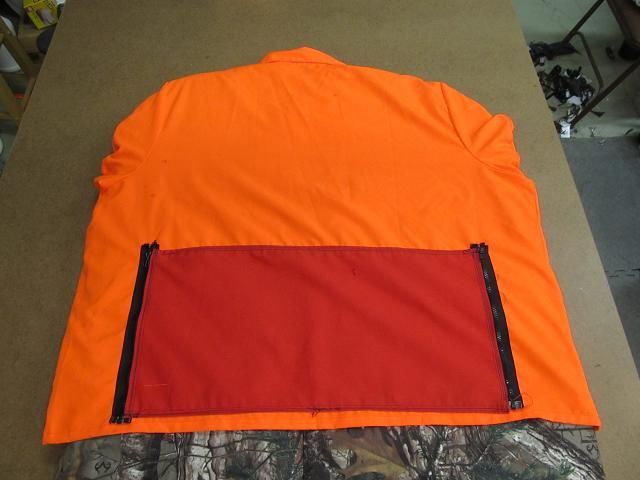 |
|
|
|
Post by Ron on Dec 30, 2013 13:39:05 GMT -6
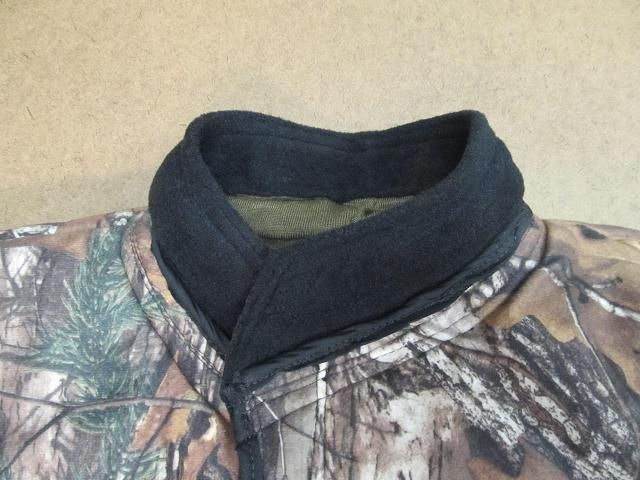
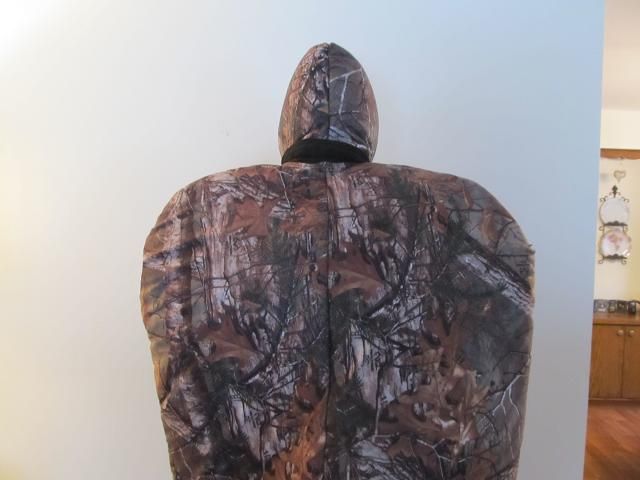
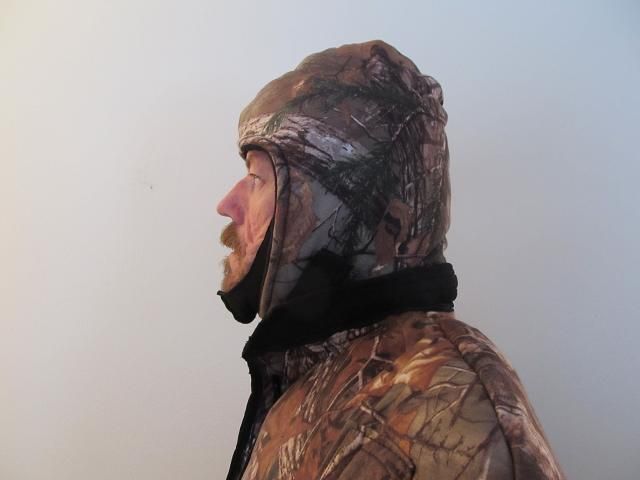
The suit needs a hood since most of our heat is lost out of the top of our heads. Tthe hood cant be attached to the suit since you cant turn your head and even if you did the hood would remain stationary so when you turn you would see only the inside of the hood. I also wanted a separate liner/balaclava made form Polaratec Fleece that would be worn under the hood. Polartec fleece stretches in one direction so the pattern has to patch the stretch. I pinned the two layers together with the soft fleece facing inwards. Then sewed it, trimmed it and experimented with the opening until I got what I wanted. 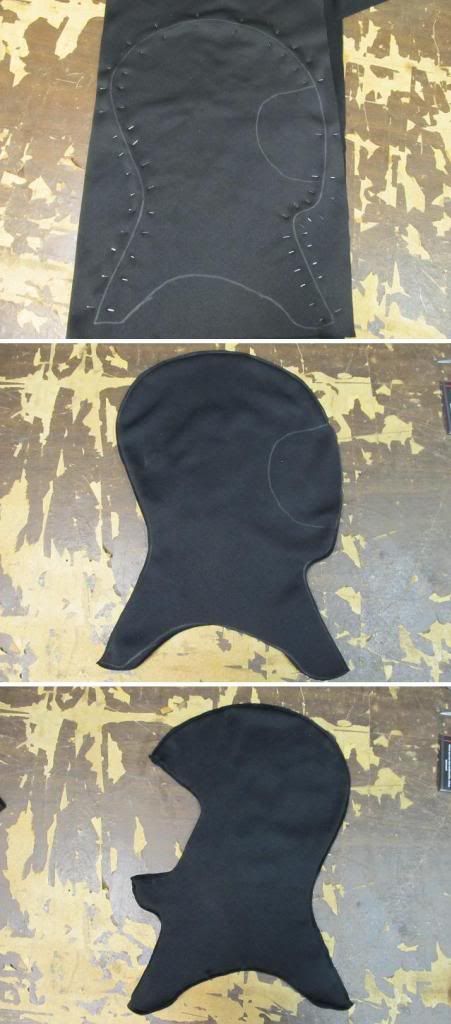 The hood itself is made like the suit with one exception. I added another layer of 3M Thinsulate insulation. It made the layers a bit more bulky to sew but the machine handled it. The 6 layers are sewn inside out around the face and neck opening but not across the head seam. The hood will be turned right side out and the two halves will be joined together. Then the entire hood is turned right side out. 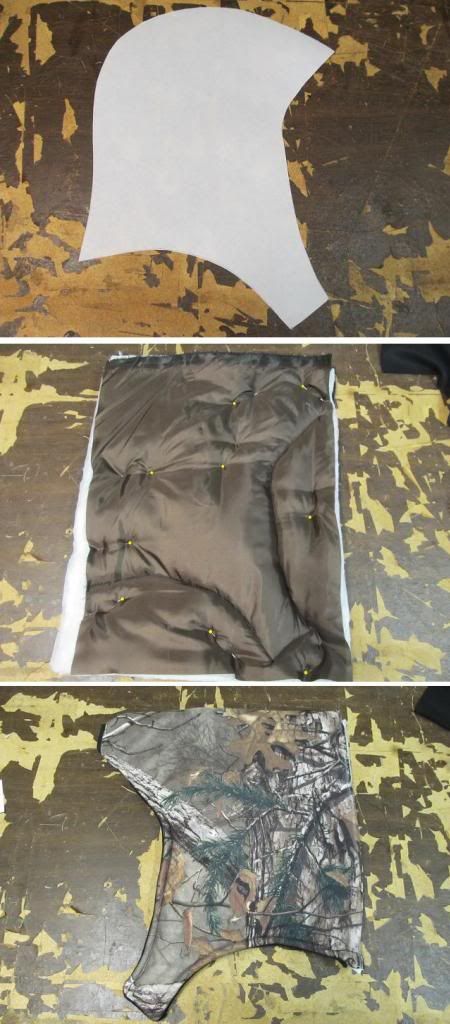 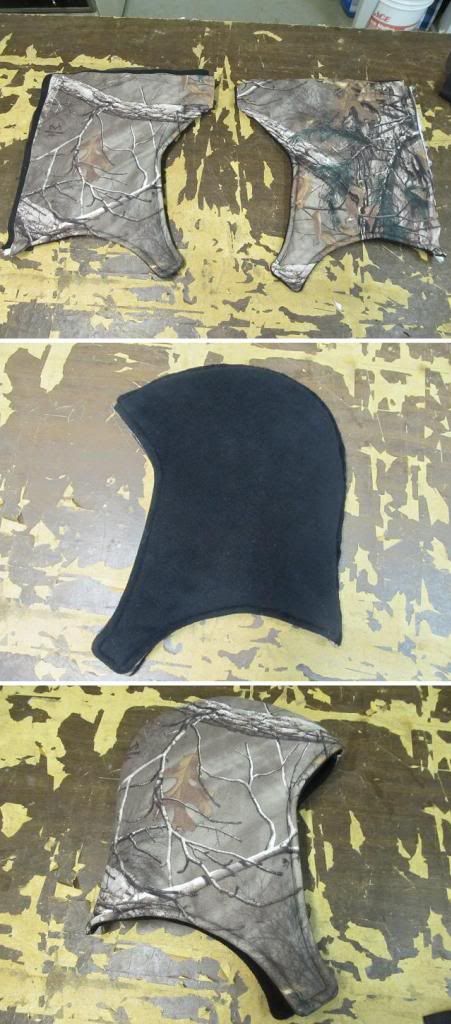 Next I added a bit of webbing and some Velcro for the closure. 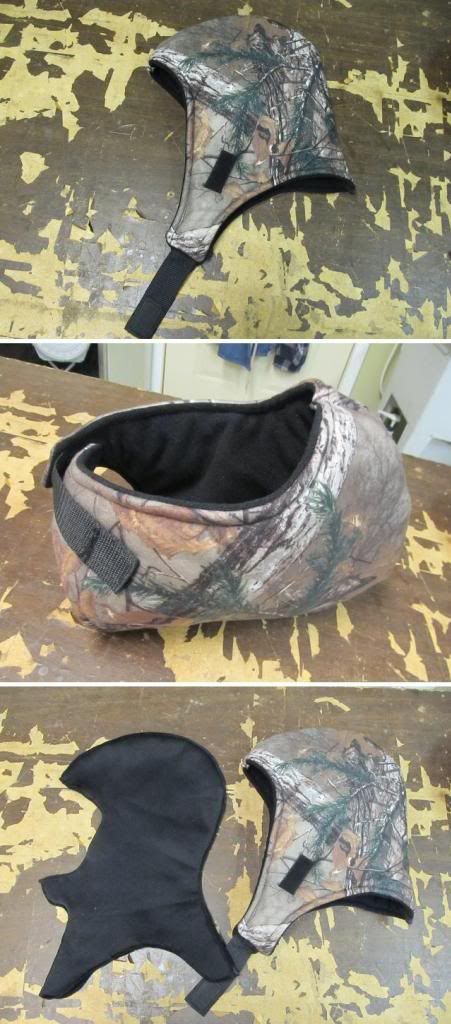 The finished hood and balaclava worn by a handsome hood model. ;-) During firearms seasons an orange knit cap can be worn over the top.  |
|
|
|
Post by Ron on Dec 30, 2013 14:07:54 GMT -6
The heater body suit comes with a snap that limits the travel of the zipper. The zipper opens so free and easy that when you bring your arms out of the suit the zipper travels all the way to the bottom. To remedy this they added a snap just below waist height to stop the zipper from going too far. I found the same issue with my suit so I too added a snap to limit the zipper travel while hunting but the snap can be undone to make it easier to get in and out of the suit. These are the same snaps I use when I make pistol holsters or knife sheaths.  |
|
|
|
Post by Ron on Dec 31, 2013 11:22:24 GMT -6
|
|
|
|
Post by Ron on Dec 31, 2013 18:43:29 GMT -6
I tallied up all the receipts for the suit. The total came to $158.2 for the suit and $25 for the back pack sac. This is because I bought using 50% off coupons or cyber Monday sales. Had I paid full price for everything I got half off it would have come to about $290 (not everything was subject to 50% off offers).
I was given some 3M Thinsulate insulation by a bowsiter but it wasn’t enough for the whole suit so I bought enough for the entire suit at Vogue fabrics online. That was perhaps the most expensive part of this project at $32.
The heater Body suit with the additional orange shell and hood and knapsack would have run me $504 (nearly 3 times what it cost me to make my own) and the heater body suit does not have the 2 additional zippers or chest pocket (meaning I could buy what I really wanted so I made it myself) not to mention I would not have been able to learn how to make additional product like this for myself (I find great value in the learning/self-reliance aspect).
|
|
|
|
Post by Ron on Jan 1, 2014 10:32:09 GMT -6
Its not realistic to try and tally the time in a first prototype and think that is the time required to make the suite as there was much time experimenting and trying to figure it out. I visited a parts maker for the company I work for and he asked if I wanted to see a $10,000 part, I said sure. He showed me this tiny metal device and said the very next one off the line cost 29 cents as will every other one he makes.
At the same time I don’t capture time in hobbies and enjoyable endeavors as they add value to my life. I don’t use time as a cost vector for value if I am out on a date with my bride or fishing (to see if the fish was a value over what I could buy). This sort of time spent is a net plus to me not a cost. It adds to the enjoyment as do all my hobbies. I stopped watching TV 9 years ago as I found that to be a very costly waste of my time. The time spent on this prototype suit was not totaled but it was enjoyable.
|
|
|
|
Post by Ron on Jan 6, 2014 12:31:18 GMT -6
I tested out my suit today. The air temp was -15F with a windchill around -45F. The plan was to sit out for a couple hours. I put a remote temp probe inside the suit with me in the air space between my outermost layer of clothing and the inside of the suit. It never got below 48 degrees but got as warm as 50 degrees. An hour and 10 minutes into the test, Josh tried to start my wife’s car and it would not start so I had to stop the test to address getting his car out of the garage and her car in and some heaters set up to warm the car. I don’t think I would ever hunt in such dangerously cold weather but this was an extreme test of the suit and it passed with flying colors. I never felt any wind and I stayed nice and warm. 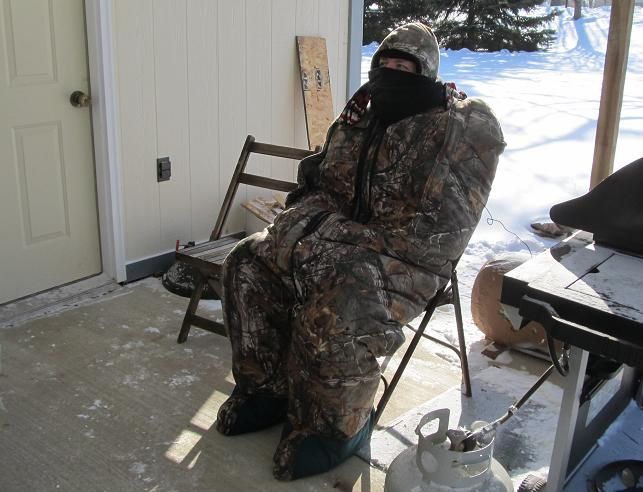 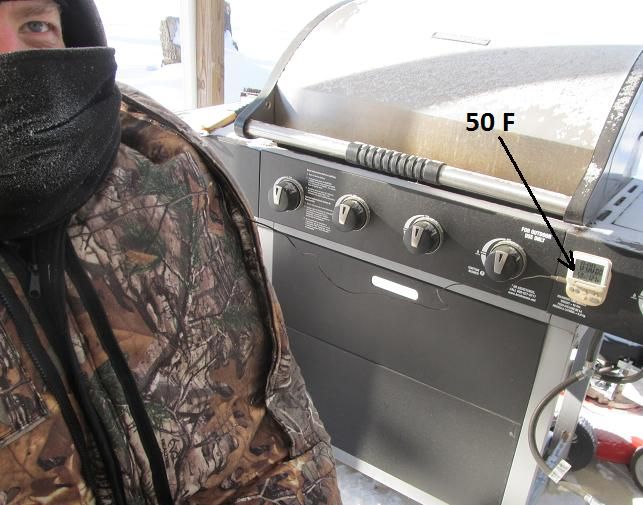  |
|